# DX2 Release Notes 2020
# OCTOBER
This release includes continued improvements to the DX2 Portal for Purchase and DX2 Portal Clients.
Please log any issues with support@olympic.co.nz.
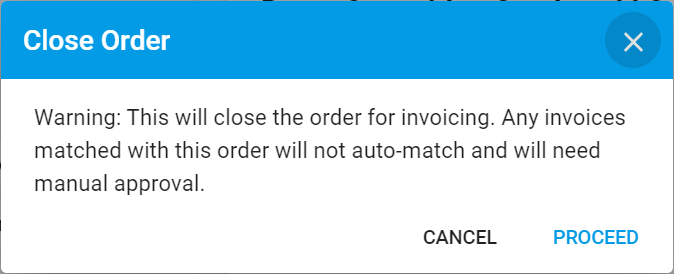
# Warning Message – Close Purchase Order From Approvals
If you have permission to close the purchase order for invoicing from the Approvals area of DX2 Portal you will now receive a warning message allowing you to back out from this operation. Note: This function closes the purchase order for invoicing it does not close the approvals page.

Click the Close Order button, a warning window will appear. If you wish to proceed click Proceed or to return to the Approvals page with no action click Cancel.
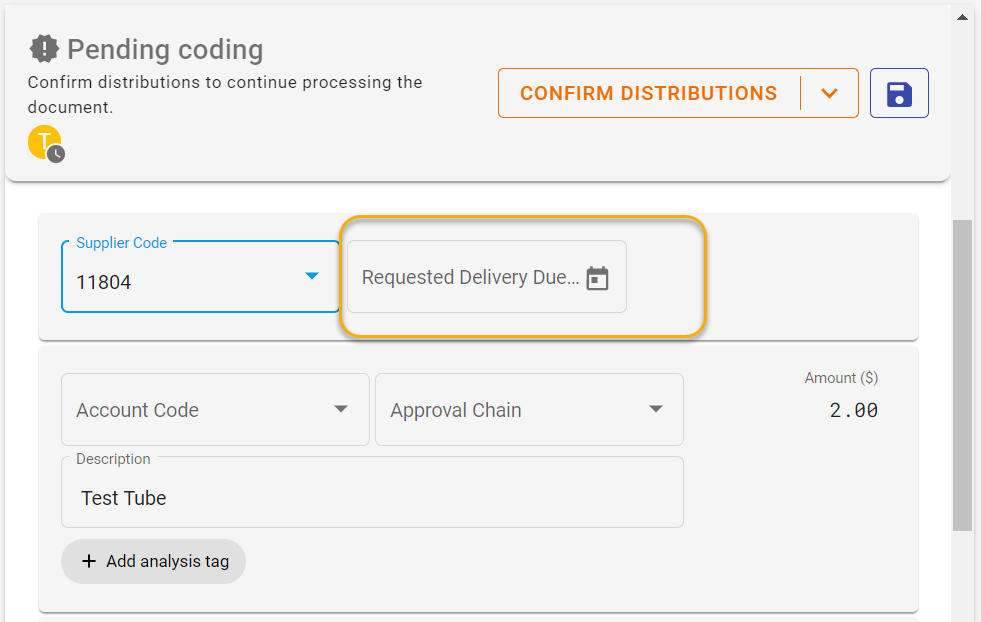
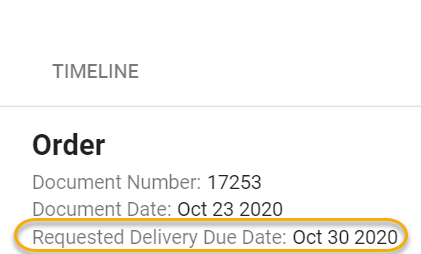
# Due Date on Orders in Approvals – Delivery Due Date Added
When approving orders, what was previously “Due Date” and related to the invoice has been repurposed for orders so you must now enter the Requested Delivery Due Date. This is added to the UBL document so can be printed on documents if you wish and shows on the documents preview page.
UBL Segment:

Preview page:
# Requisitioner Name and Email Address passed to PO UBL
When a Requisition is created in DX2 Purchase and the purchase orders created in DX2, the user and email are now passed to DX2 in the purchase order UBL Buyer Contact area. This means these fields are now available to print on the purchase order if required. Please talk to your Account Manager if you would like this information added to your purchase order.
UBL Segment:

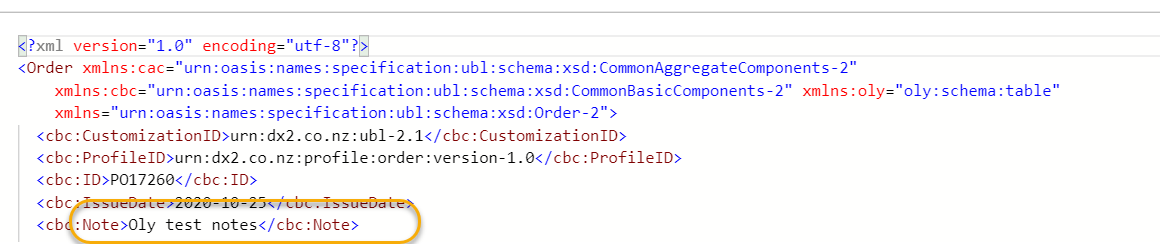
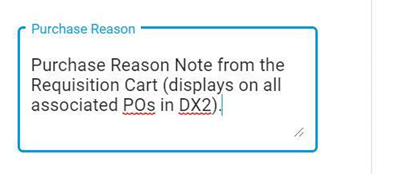
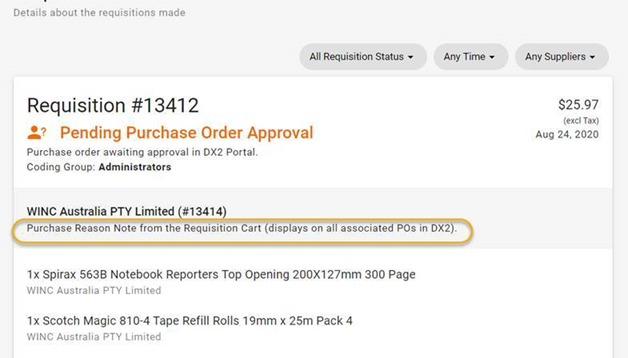
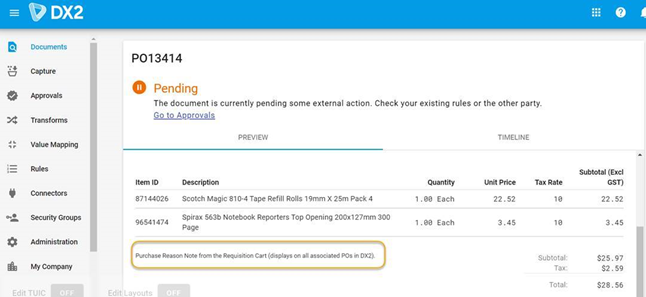
# Ability to Add/Change External Note on Purchase Order in Approvals
The Purchase Reason from the Requisition is currently brought across to all associated purchase orders in DX2 Portal and on the UBL (note area). In Approvals you can now edit the note on the Order and this is changed in the UBL also.
Note: The note cannot be changed once the document is “Approved”.
UBL Segment:
# New Version of Power BI Reports
There is a new version of Power BI reports available. If you would like these installed or would like to have a look please contact your Account Manager at Olympic.

Breakdown of new report pages:
Page 1 – Pending Action Report is a combination of the old reports pages 1 (Pending Invoices) and 2 (Pending POs) plus other new features.
One new feature being that you can send either a generic email to a specific user or an email pertaining to a particular distribution line that has been highlighted, example below.
Generic Email to User 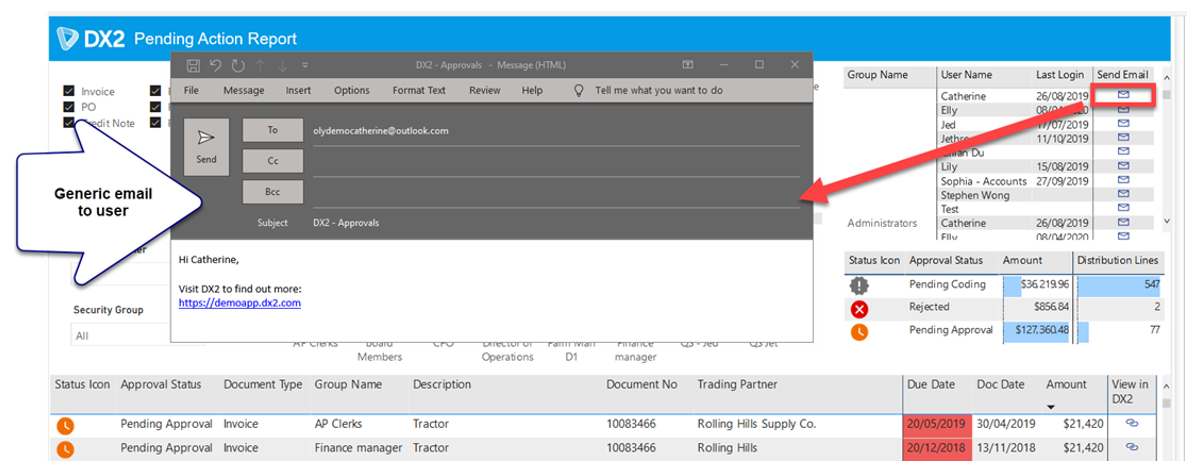
Custom Email Based on User Selecting a Distribution Line 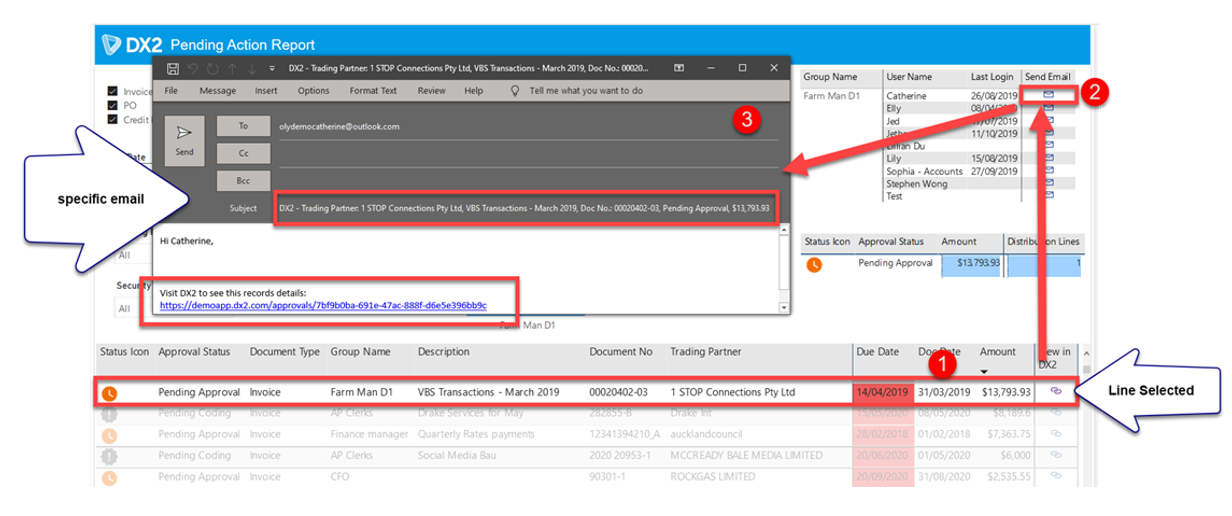
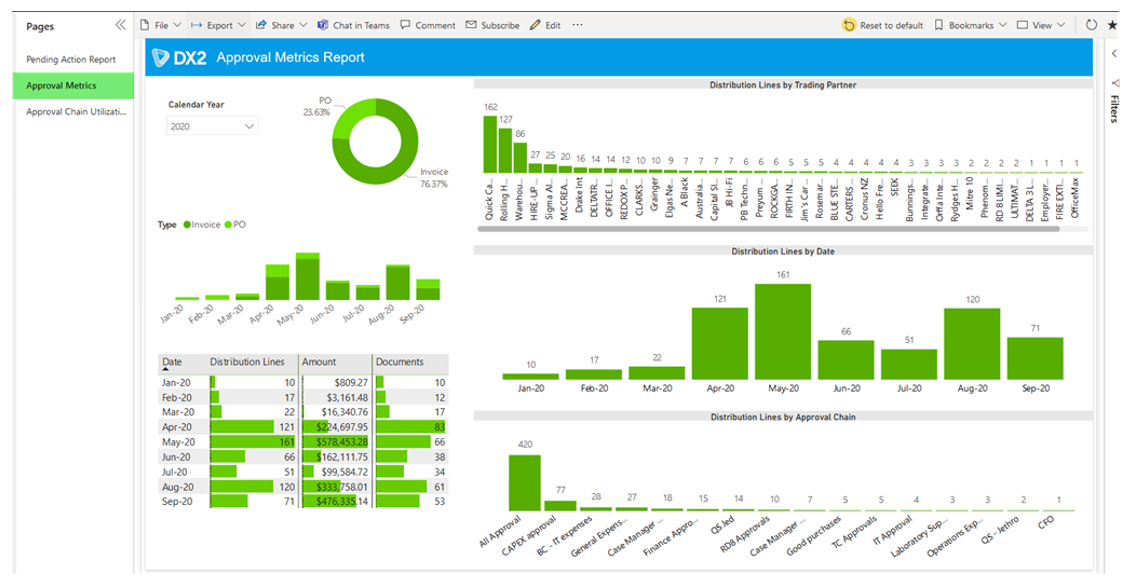
Page 2 – Approval Metrics is similar to the old reports version, however the visuals have been simplified.
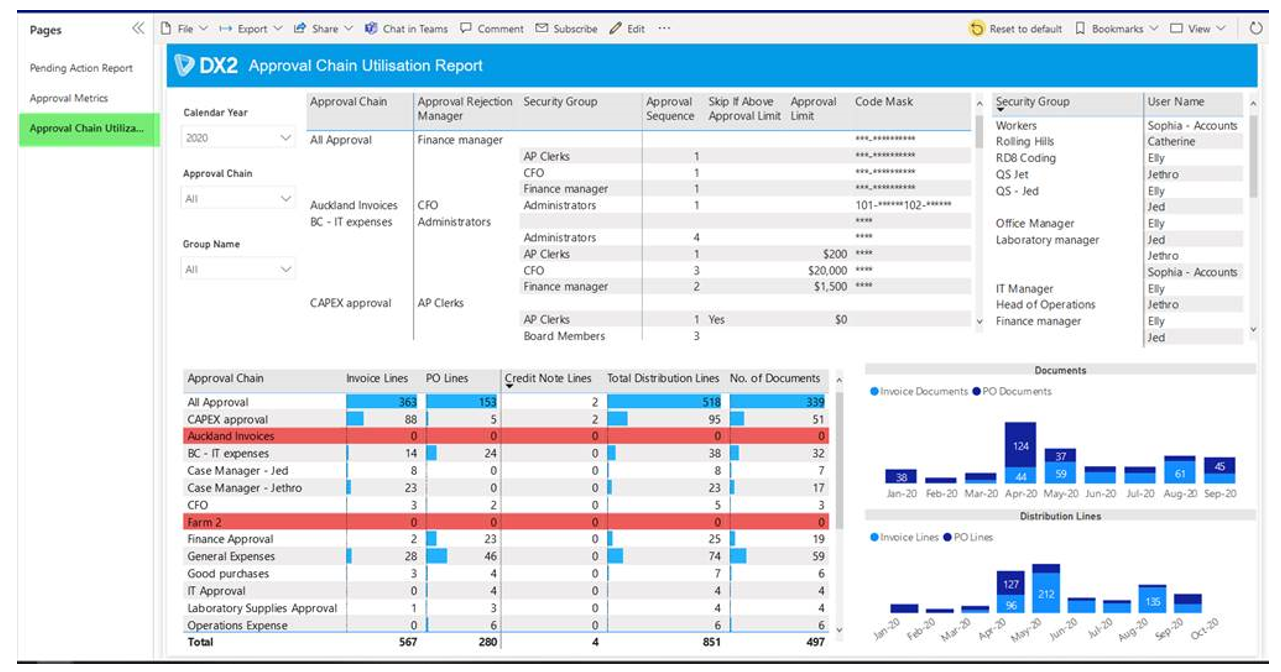
Page 3 – Approval Chain Utilization helps answer the following questions:
• How much is the Approval Chain being used?
• Which Approval Chains are not being used?
# AUGUST
This release includes continued improvements to the DX2 Portal and DX2 Purchase.
Please log any issues with support@olympic.co.nz.
# Enabled Profile Manager Permission
Within Security Groups the Profile Manager Role permission has been enhanced. If NOT checked then any users within that security group cannot update any information via the My Company area.
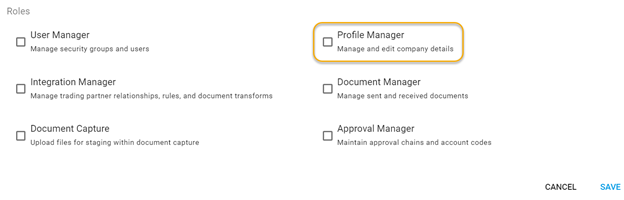
If the Profile Manager role above is NOT checked then all users in that security group will not see any update, upload, add buttons or ellipsis to enable them to add or make changes to trading partners, users or company information. They can only view information.
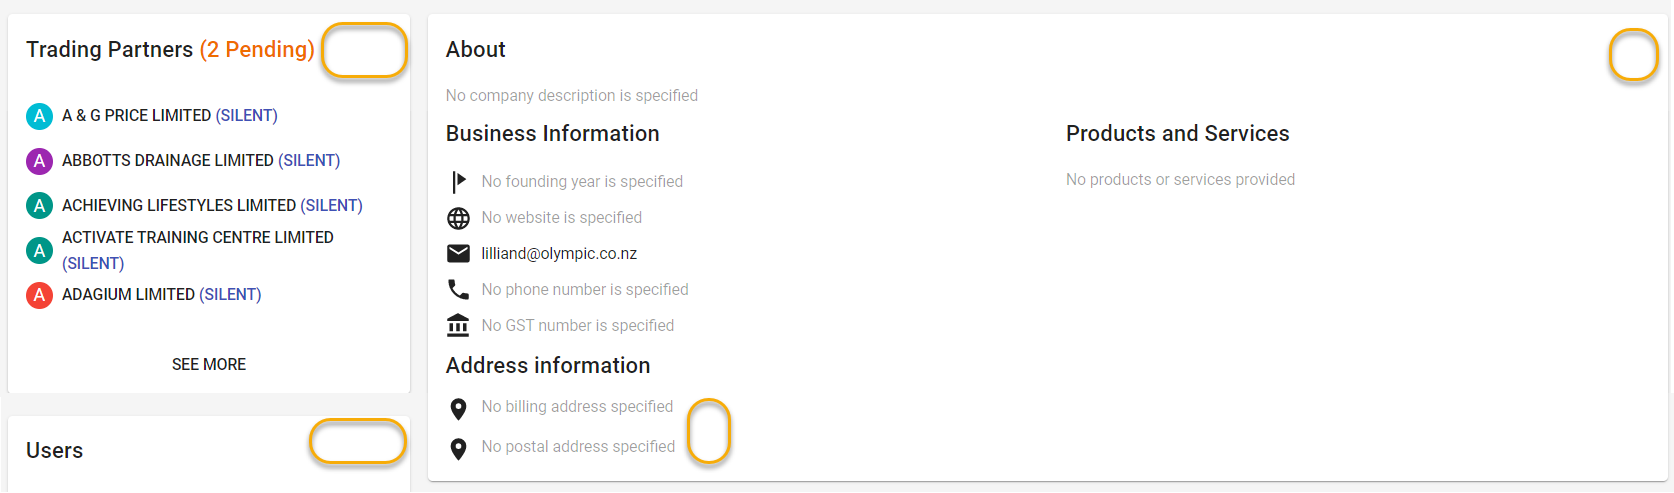
SEE MORE – Trading Partners 
Trading Partner Drill Down 
SEE MORE – Users 
# Requisition Notes Passed Through to Associated Purchase Orders
In the Purchase Cart if a “Purchase Reason” is entered then that information is passed through to the associated purchase orders in DX2. The Note is displayed on the purchase order preview in the Documents area. It is NOT included on any external emails.
Note visible in Purchase under the purchase order heading.
Note is visible in DX2 Portal document preview under the purchase order lines.
# Label Changed in Purchase Cart
Label changed from Approver Groups to PO Coder Group in Purchase Cart to better describe the outcome of selection.

# Unit Of Measure Changes
Enhancements have been made to the visibility of the UOM on items in Purchase and DX2 as follows:
DX2 Purchase
- Visible on all key areas – Item Card / Requisition PO view / Cart.
- DX2 Round Trip defaults to UOM as per supplier – if UOM not available defaults to EA.
- Can search and select UOM in Add & Edit Item.
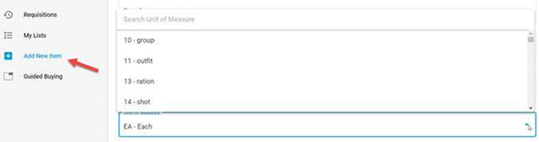
DX2 Portal Visible on PO Line in Documents view. Available in UBL if required for integration.

# JULY
This release includes continued improvements to the DX2 Portal.
Please log any issues with support@olympic.co.nz.
# Add User – New Process and Azure Active Directory (SSO)
ADD USER – AUTO SET PASSWORD VIA EMAIL
When you add a user in DX2 you are no longer prompted to enter a password.

The User you set up is emailed a temporary password with a link to login to DX2.
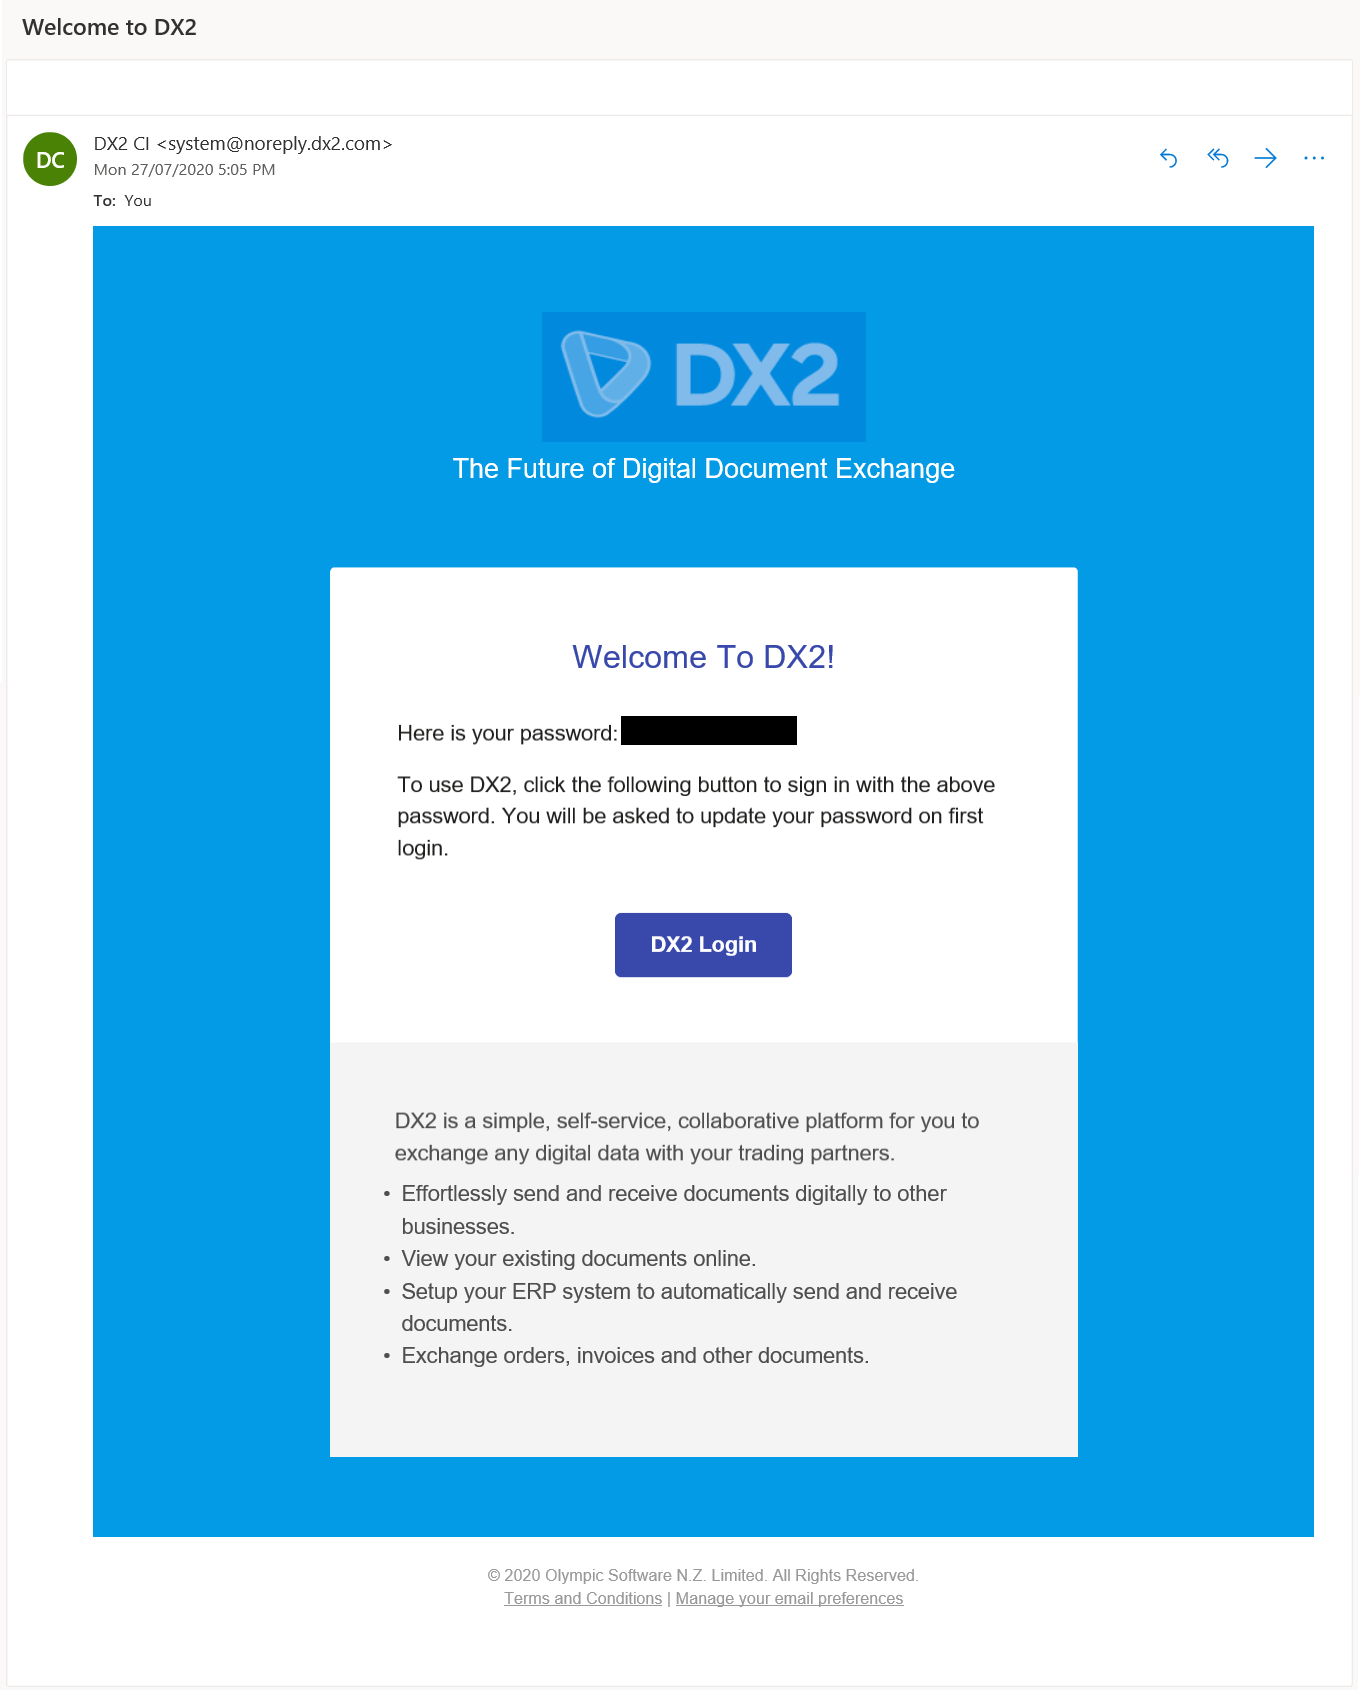
When they first login they are prompted to change it immediately.

SET UP SINGLE SIGN ON VIA AZURE ACTIVE DIRECTORY
If you use Azure Active Directory we can now set up Federation sign in (Single Sign On – SSO), for your company for use on DX2. When you add a user DX2 can detect they are part of your company domain and automatically log them into DX2 using their Active Directory login credentials.
Note: Some set up of 1-2hrs is required first by Olympic to enable this feature.
You can tell if Federation sign in is set up on DX2 when you add a new user. A message will appear as per below advising the users is eligible for federation sign in.

The User you set up is emailed a welcome email with a link to login to DX2.
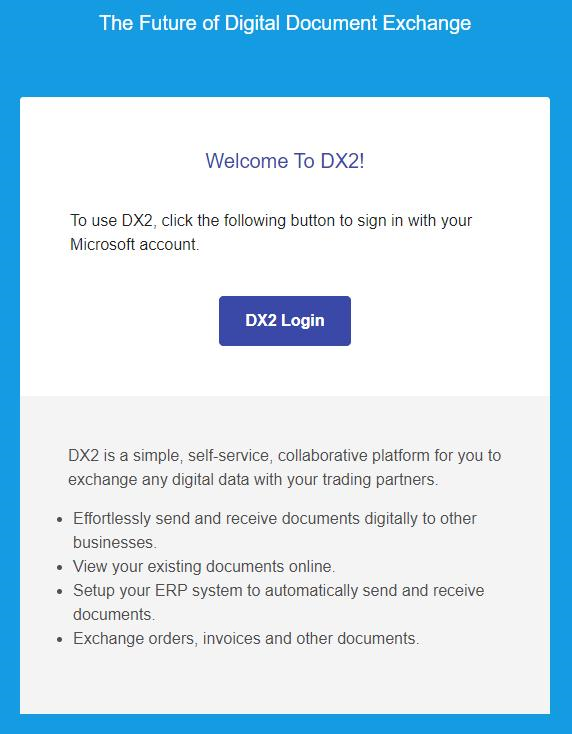
They may be prompted to select their company account particularly if it is the first time they are logging in.
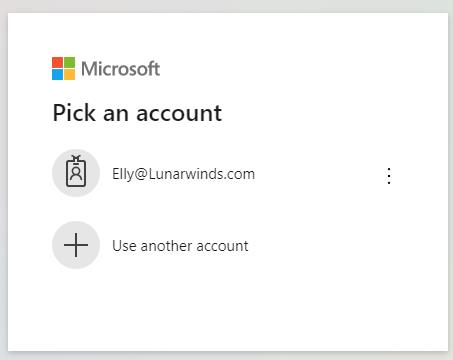
The following consent screen will populate, and this is expected behaviour the first time logging in. The user clicks Accept. This will need to be done only once.
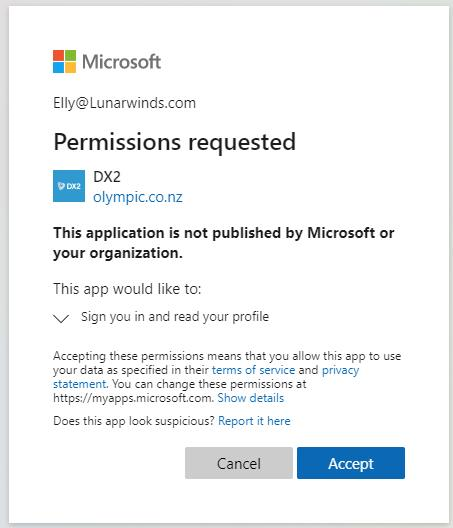
Once the user selects Accept they would have completed the federation log in process.
# MAY
This release includes continued improvements to the DX2 Portal.
Please log any issues with support@olympic.co.nz.
# Enhancements – Distribution Summary
When splitting your invoice lines you also now have the ability to split by quantity.
Note: Your Security Group will require the "Account Coder" permission to be able to access this functionality.
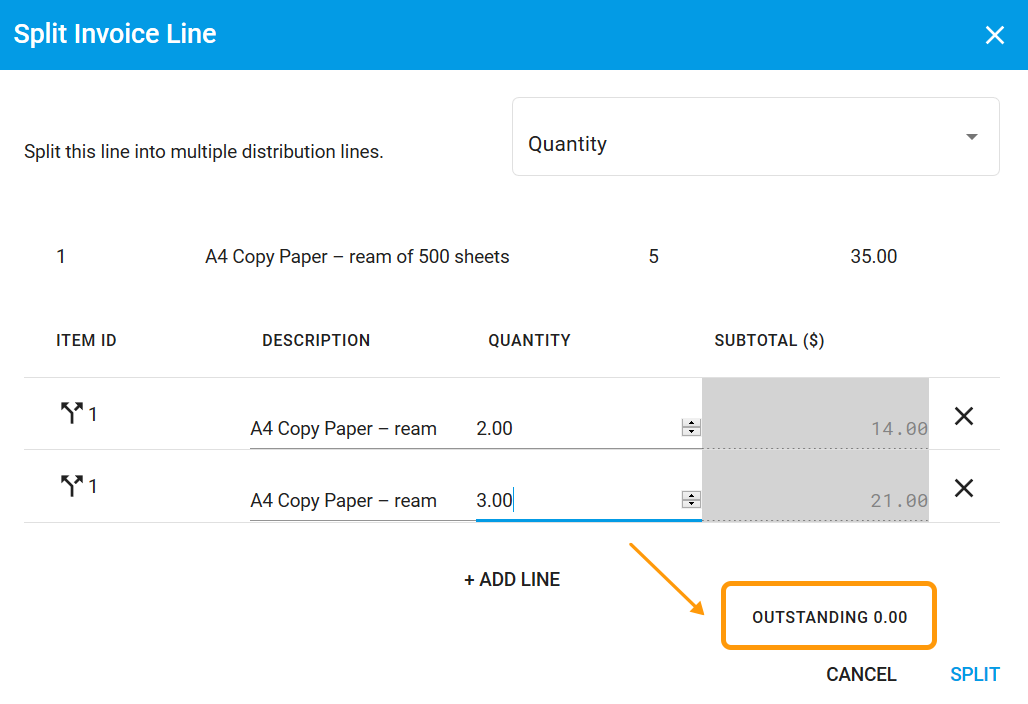
# Split a Line By Quantity
We have added a Quantity column to the Distribution Summary table and you now have the ability to split a line by Quantity (as well as Sub Total).
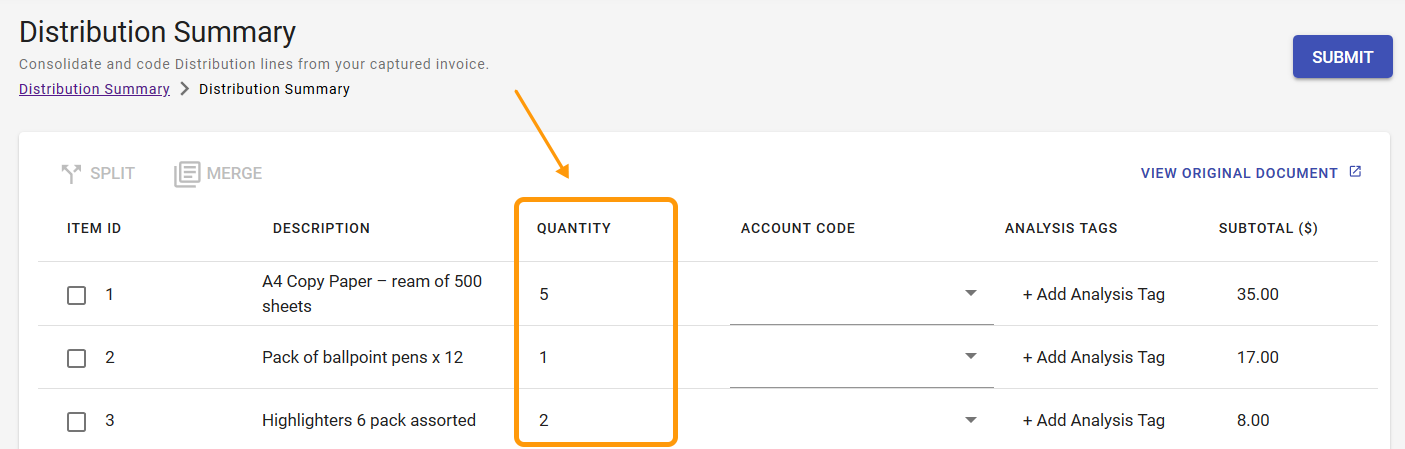
Select 1 line and click the Split button.
When in the Split window, select Quantity from the dropdown (defaults to Sub Total).
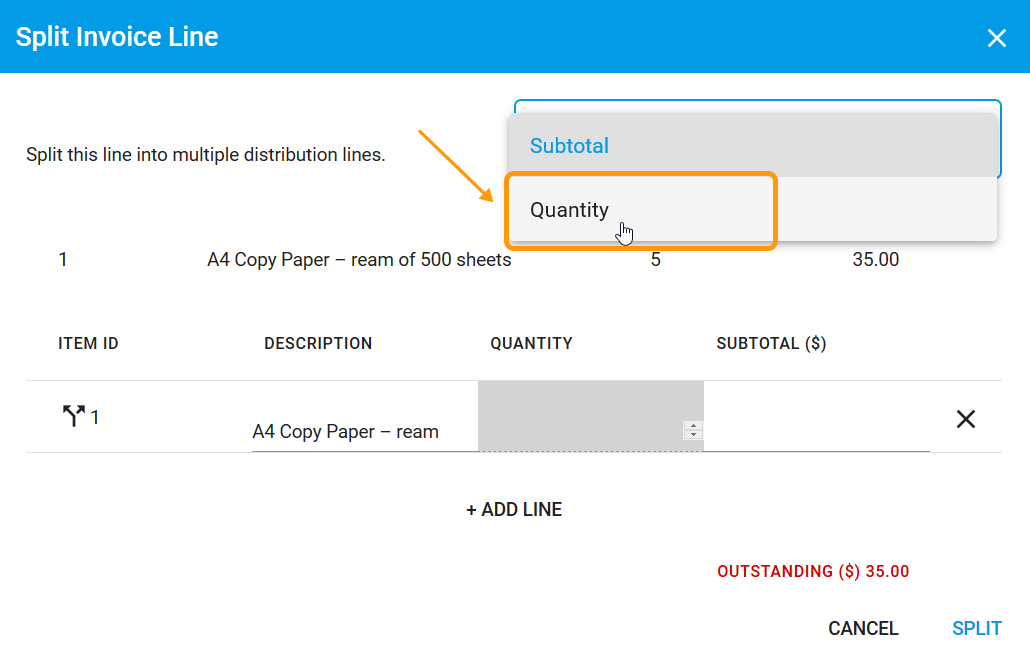
Split the lines as required and enter the quantities. Note the Outstanding must equal 0.00 before you click Split.
Rounding Tip
If there is a rounding difference the amount will be added to the last line.
You can then code the lines to the correct GL Codes for the relevant departments.
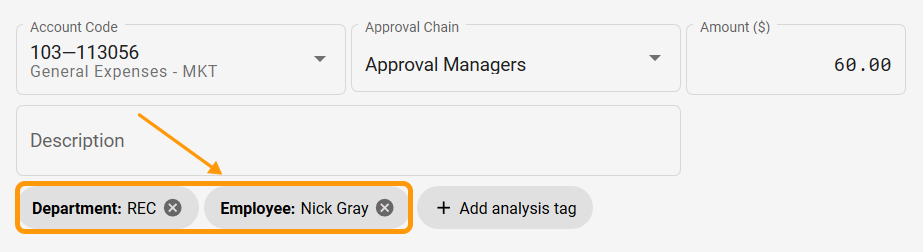
# Add Analysis Tags
You can now add Analysis Tags to distribution lines in the Distribution Summary screen as well.
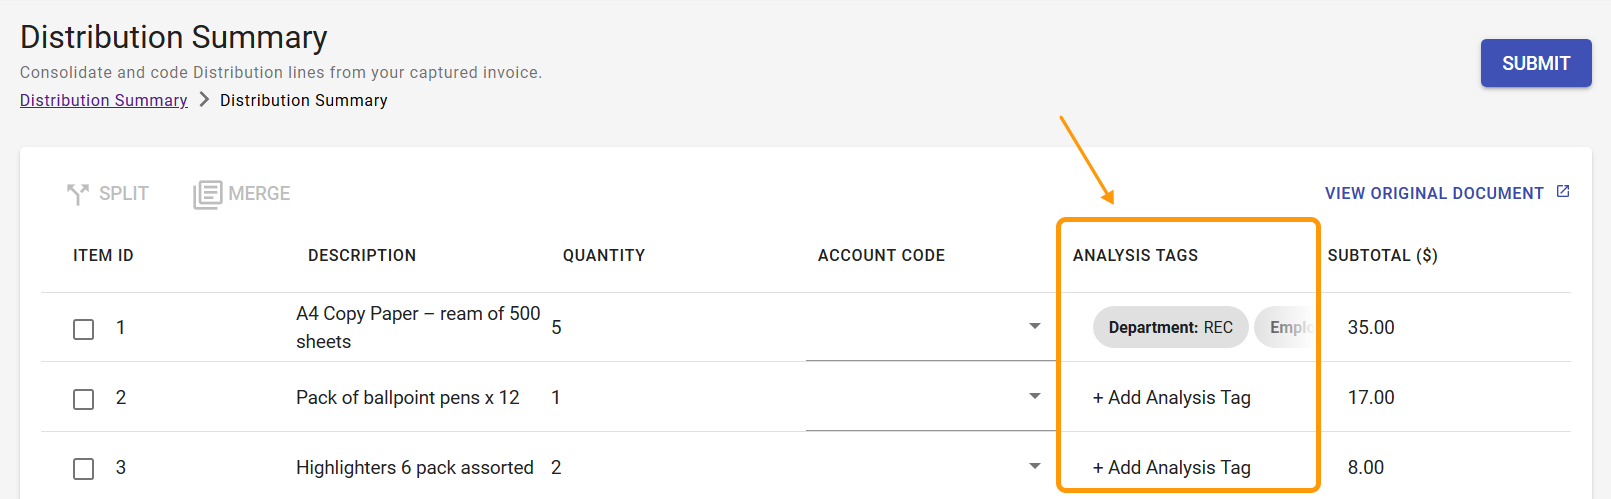
Note: Required analysis tags will still be managed via the approvals area on the distribution lines.
The analysis tags are carried through to the approvals distribution lines.
# Enhancement – Ability to Approve Orders from Email
You can now approve Orders from email, in addition to invoices.
A feature is available to allow your staff to action various requirements directly from within the email sent to them (i.e. they do not need to go back to the DX2 portal unless changes are required):
- Approve - approve the document as is:

Recode - send back for recode (a reason is required):

Reject - reject a document:

- Click the Invoice file name - this will take the user back to the DX2 portal.
# Enhancement – Activity Panel
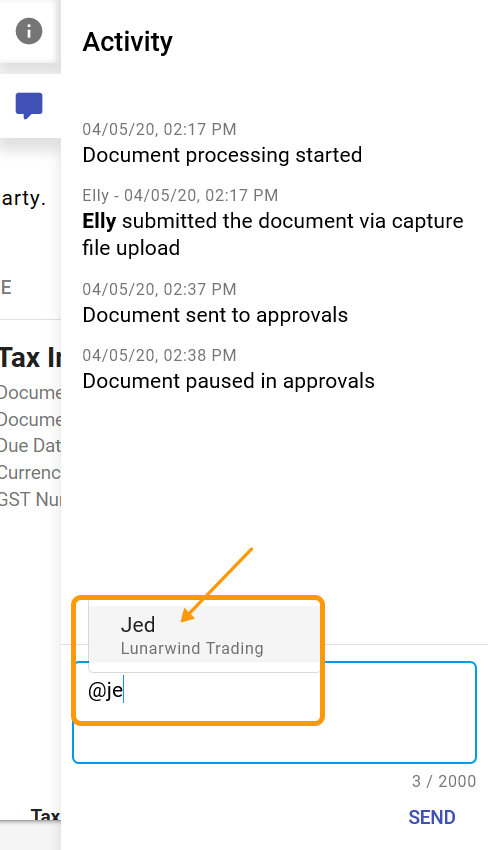
Comments for specific people or general comments on documents
On the Activity Panel you can now add a comment to a specific @person. If typing in a person’s name you can only select/send to users who are relevant to the document’s Trading Partner or within your own company. The comment is also emailed to the relevant person as well as showing in their notifications.
IMPORTANT!
Users from both the sending and receiving ends of the Document can view the comment on the document. If they are Active and can log in (or in the future if they become an active Trading Partner with you). I.e. Comments are not private but open communication between Trading Partners.
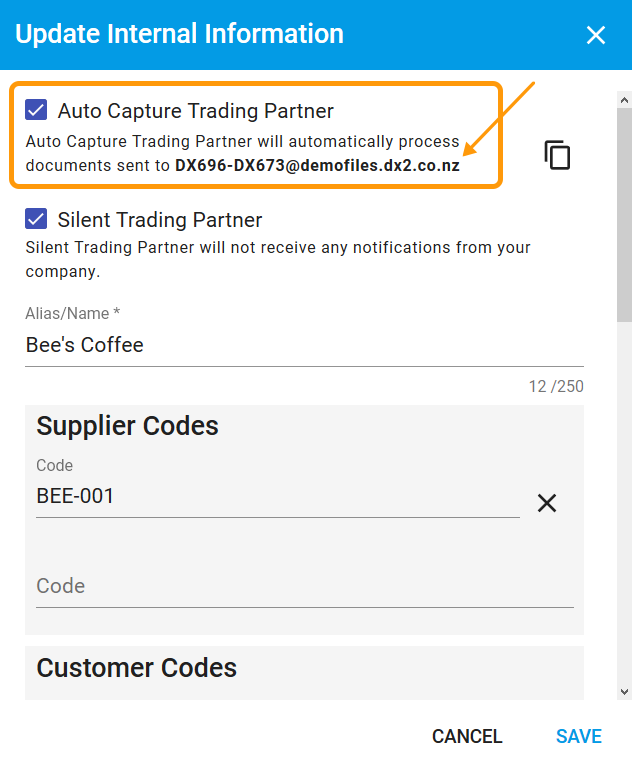
# New – Auto Capture Trading Partner
If you have capture templates that always capture 100% of information on an invoice you can now turn on the “Auto Capture Trading Partner” feature.
Once this is turned on for a Trading Partner, you can email that Trading Partner’s documents to the unique email address as indicated for that Trading Partner, e.g. as per below – DX126-DX51@demofiles.dx2.com, and the file will:
- Go straight to status “Processing” in the Capture files list
- Automatically capture the invoice file as per the Trading Partner’s template
- Submit for approval.
If the capture fails for any reason then the document will not be submitted and the file will go back to a “Ready” state on the Capture files list where you can manually capture it.
If the document is submitted but has not been auto-captured correctly then the document will need to be discarded and re-captured manually. Remember you should only use Auto Capture when the document can be captured correctly 100%.
# Set Up Auto Capture for a Trading Partner
To set up the Auto Capture function for a Trading Partner, you can check the Auto Capture Trading Partner checkbox when submitting the document. Once this box is checked you can then email invoices directly to the unique Trading Partner email address and the auto capture will happen.

ALTERNATIVELY you can go to the My Company page and search for the relevant Trading Partner and click the 3 Ellipsis menu to open the Internal Info window.
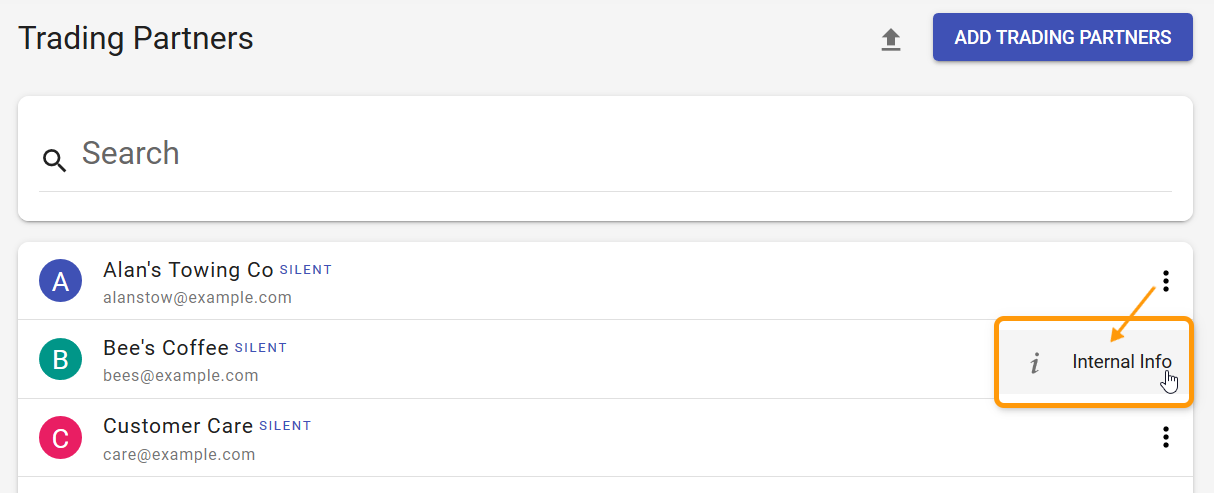
Check the Auto Capture Trading Partner checkbox. This is also where you can find the unique email address that you will need to send the invoices for them to Auto Capture and submit. E.g. DX696-D673@demofiles.dx2.com.
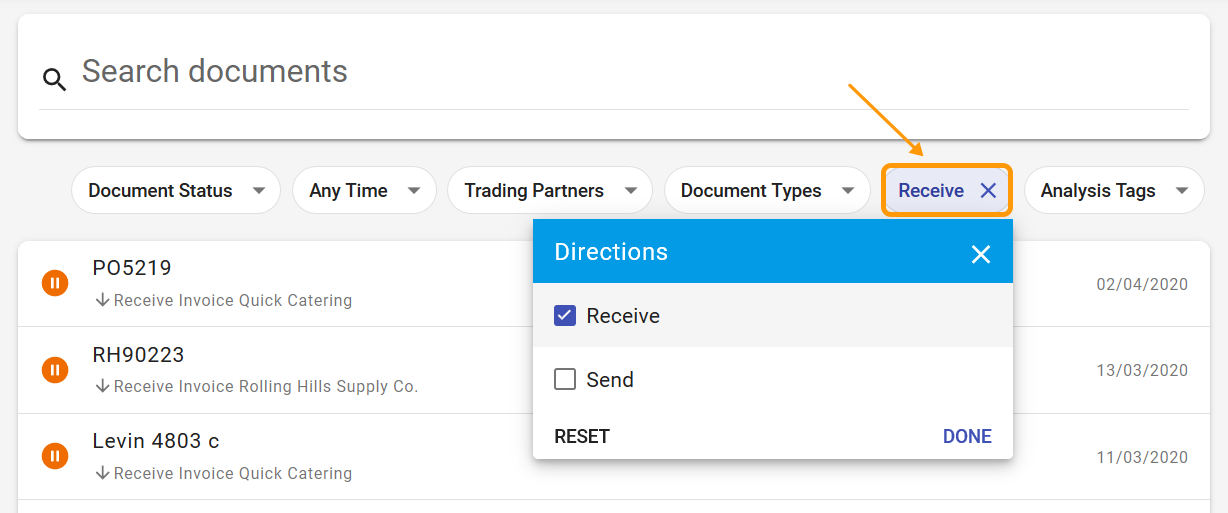
# New – Directions Filter for Documents
A new filter has been added to the Documents page, so that you can now filter by Direction. An example where this is useful, could be if you wanted to see all invoices received in a particular day, you can add a Directions filter for Receive, a filter for Document Type Invoice and filter on the date.
# New – DX2 is Going International
We will soon be changing the DX2 url address to DX2.com from dx2.co.nz, as we pursue exciting growth in the international market.
Rest assured your existing shortcuts and use of dx2.co.nz will not be impacted by this change. If you do experience any issues please contact us.
# APRIL
This release includes continued improvements to the DX2 Portal.
Please log any issues with support@olympic.co.nz.
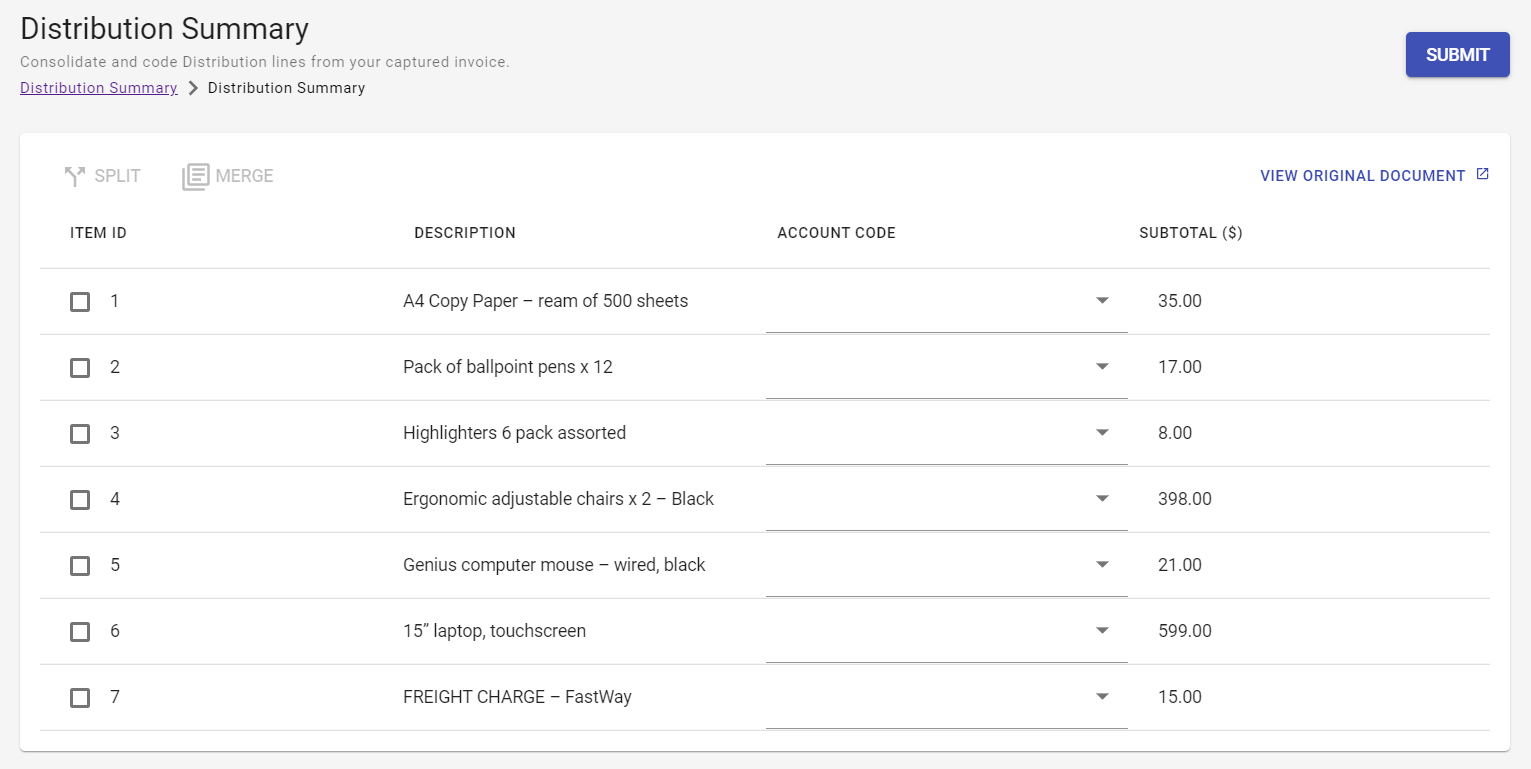
# New – Distribution Summary (Ability to Code Invoice Statements -Bulk Grouping and Coding)
The administration to code Invoice Statements where the various lines require splitting and merging to get the correct distributions across divisions or branches has always been a fairly manual task generally done in Excel.
Now in DX2 you can redirect those large Invoice/Statements post Capture to our new Distributions area where you can manipulate the data to your requirements pre-approval.
Examples – Travel invoices split across divisions. Vet bills on farms - various lines merged to a single amount to code to a certain GL Code – i.e. all lines for drugs. Vodafone account – different page per branch coded to those specific branch GL Codes.
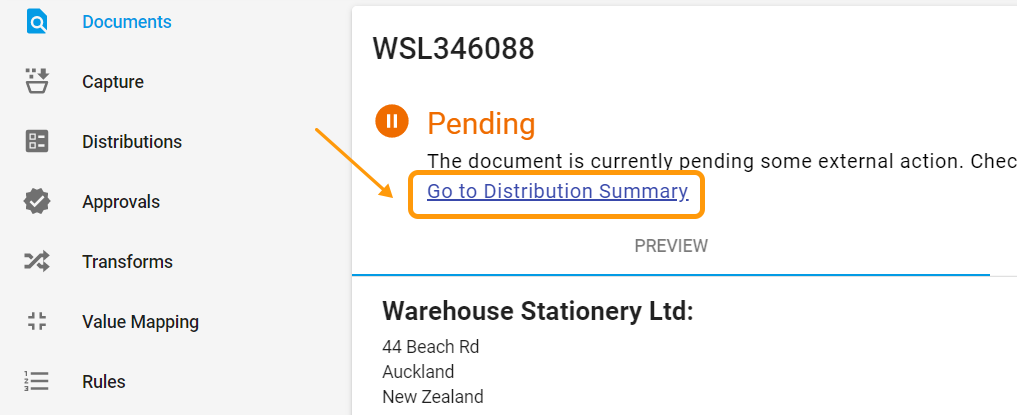
A new Rule is set up (one off for each relevant Trading Partner) to recognize the Trading Partner(s) and direct the invoice and user to the Documents page upon submission from Capture, where you will see the Invoice as status Pending Distribution Summary. You can either click the Go to Distribution Summary link:
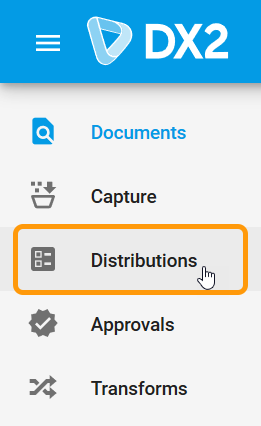
Or, you can access all pending Invoice/Statements via the menu option Distributions at any time:
Note: Your Security Group will require the Account Coder permission to be able to access this functionality.
Once in the Distributions Summary page there are various actions you can take:
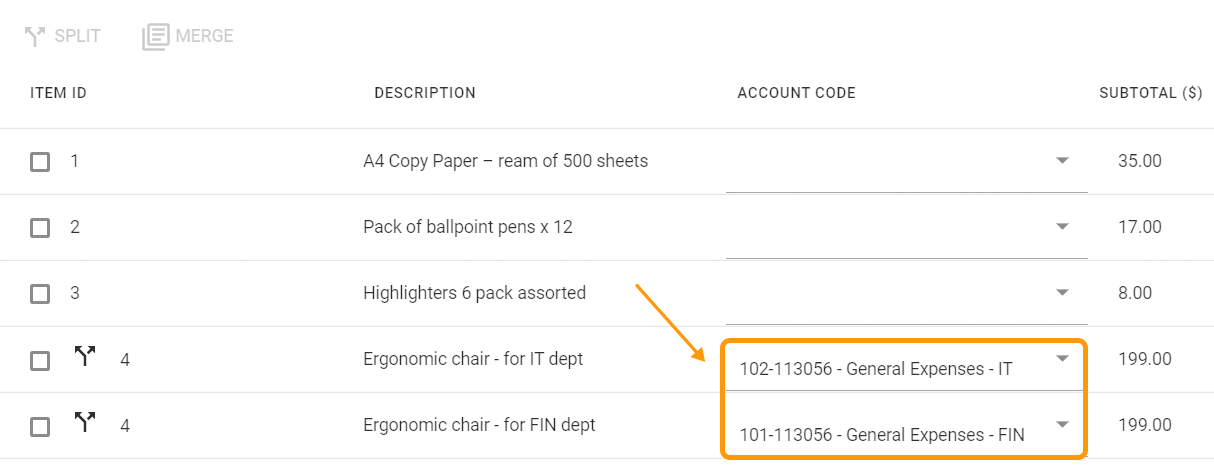
# Split a Line
Select 1 line and click the Split button.
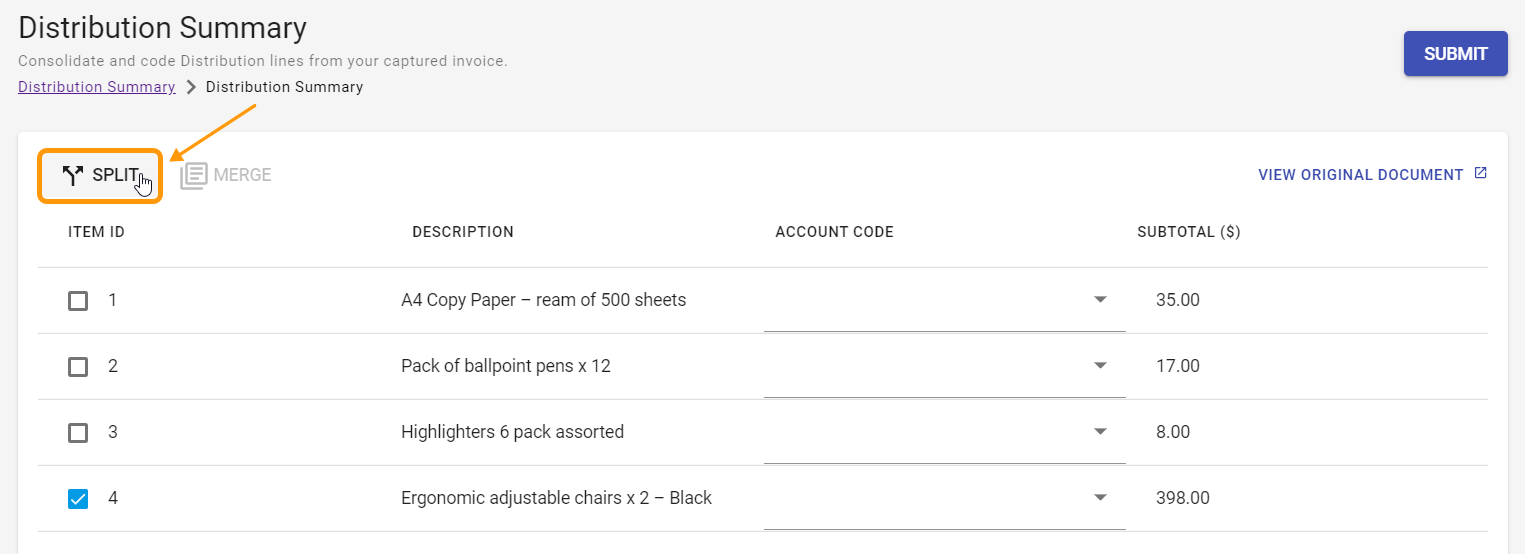
This opens up a window where you can split the line as many times as required either by value or %. Edit the description fields and when done, click Split.
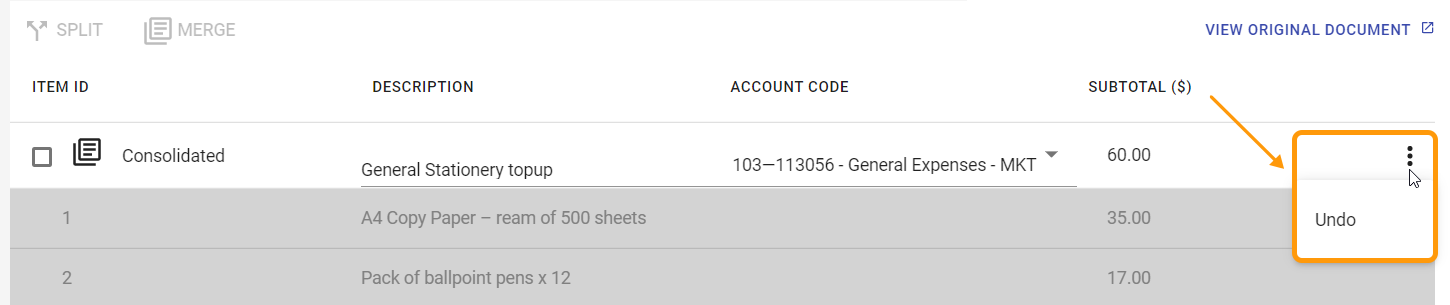
Note: Once split you can only consolidate (undo) by using the Merge button.
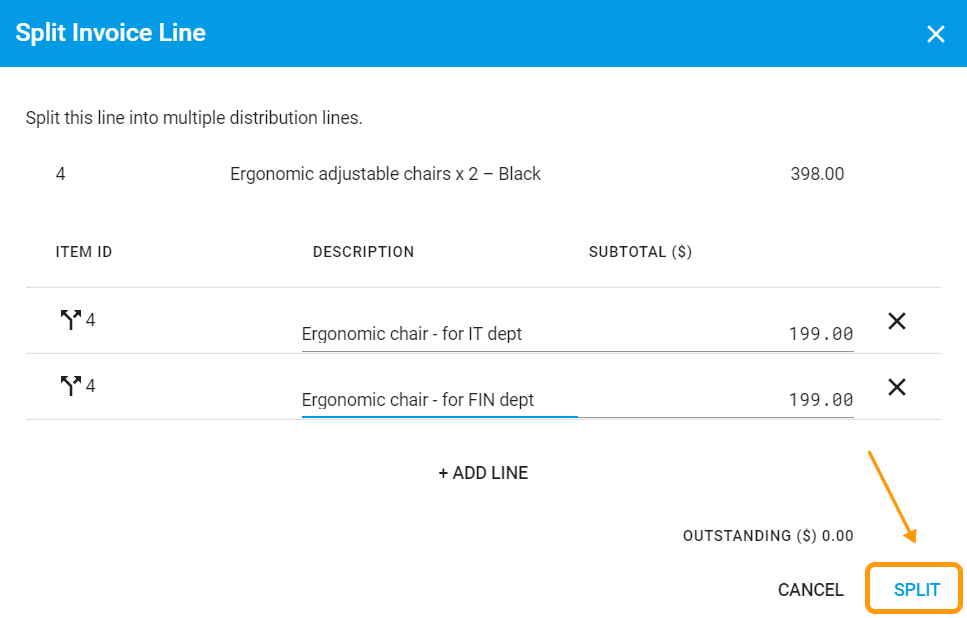
You can then code the split lines to the correct GL Codes for the relevant departments.
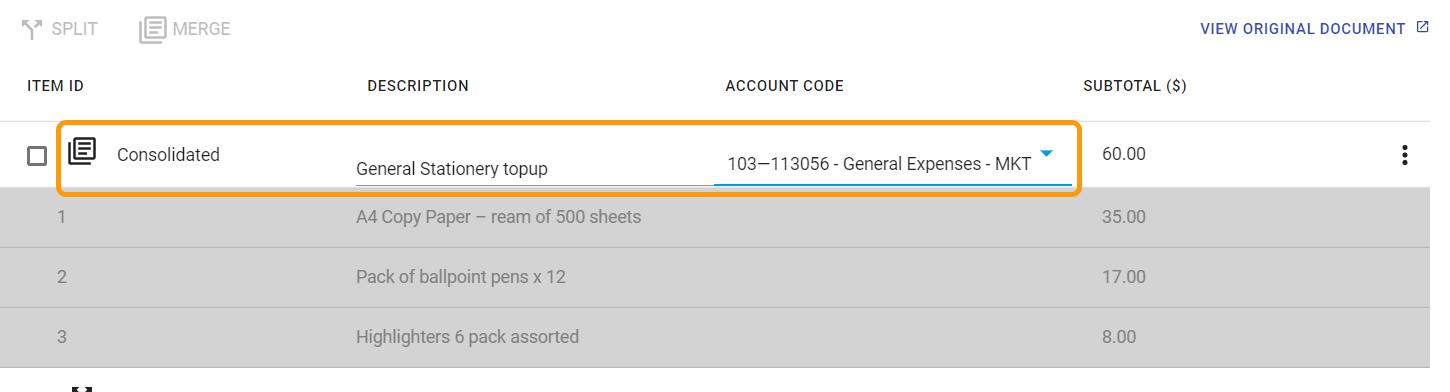
# Merge a Line
Select multiple lines (2 or more) and click the Merge button.
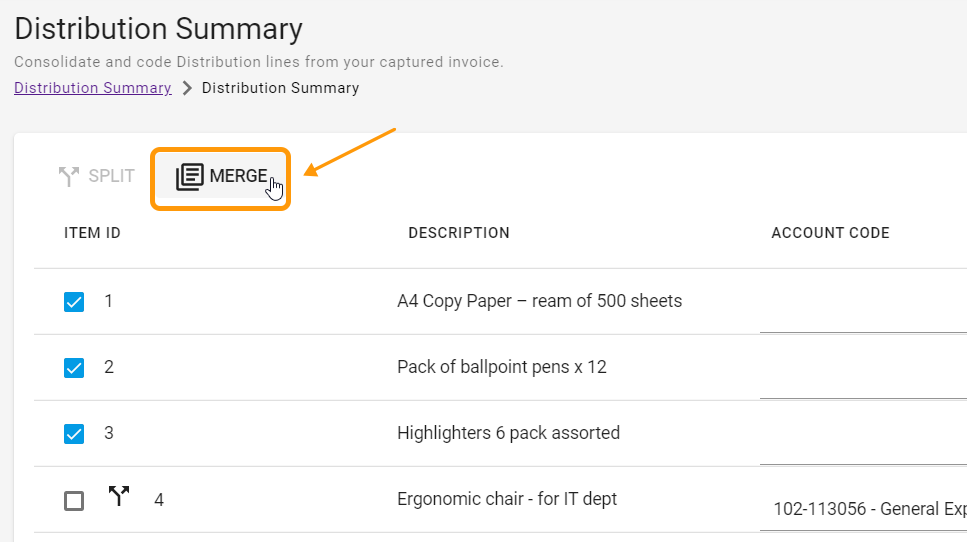
The Lines selected and associated totals are consolidated and you can then add a Description and relevant GL Account Code distribution.
To “undo” the merge click the Undo button selected from the ellipsis next to the line:
You can add additional lines to an already consolidated group of lines by selecting the consolidated line and the other lines you wish to add and clicking the Merge button.
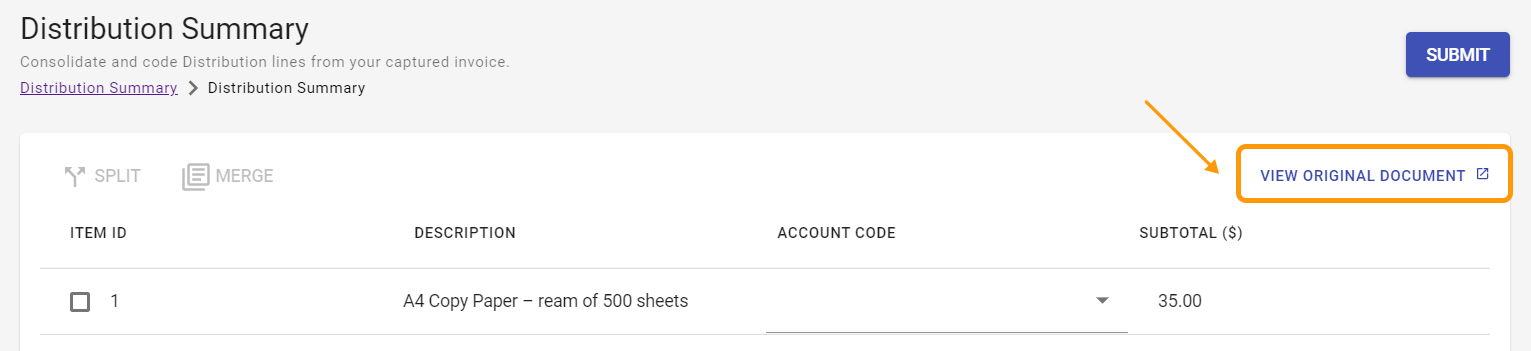
# View Original Document
To view the original document click the link below and a new browser tab will open for you to view it.
# Submit
To submit the changes to Approvals click the Submit button.
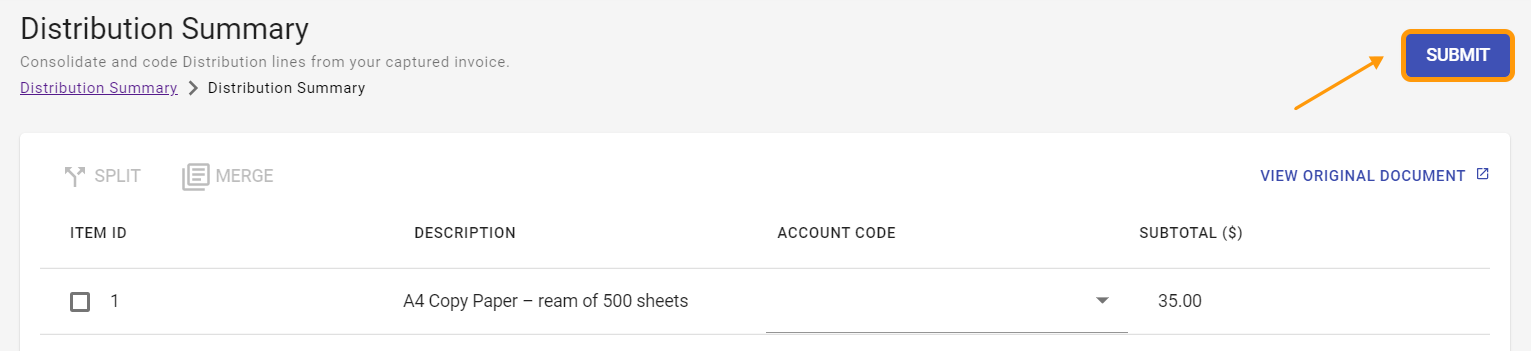
Once submitted further changes are not allowed via the Distribution Summary page. Changes to codes can still be made via the distribution area in approvals.
Any lines left that have not been split or merged or have the account code left blank will be added to the Distribution Lines listed in Approvals for coding if needed.
In the Approvals area at the bottom of the page the original invoice lines can still be viewed.
# New – Generate a PDF attachment from EDI Documents
Some companies require a view of EDI documents for their Trading Partners or own staff to view and check information in a readable form (I.e. not raw XML). Currently for EDI transactions any attachments need to be scanned and manually attached.
We now have functionality in DX2 that allows us to push EDI documents e.g. in xml format (currently invoices) through a workflow process upon import to DX2 to generate a PDF attachment against the document based on the raw xml data.
We use Word templates to generate the invoice document so we can customize for Trading Partners if required (e.g. adding a logo). A QR Code is also included on the document so if someone has a printed copy they can use the QR code to take them directly back into the original document view in DX2.
Customisation is required per EDI Trading Partner for any that need this functionality but this can be done as part of the EDI implementation project. The consulting includes setting up the required DX2 Rule, Workflow and Template for the Trading Partner.
This functionality is turned off at a Tenant level so we can enable if you wish to use for your EDI requirements. Please contact your Account Manager if interested.
The standard template document looks as per below but can be customized – e.g. Adding a logo.
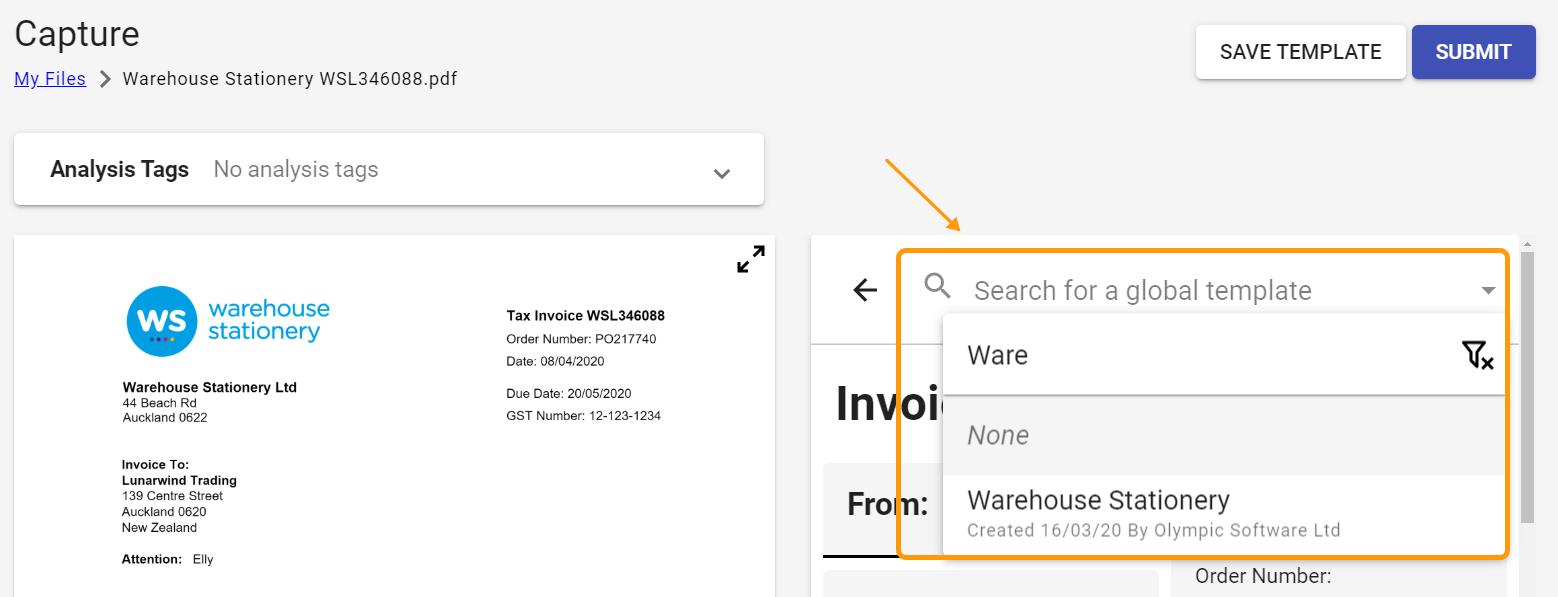
# New – Global Templates in Capture
This feature is particularly useful for those companies setting up Capture Templates for the first time or you may even like to choose one from the list that you already have a template for just to see if there’s a better way of capturing information.
To access the Global Templates list go into Capture and select your file for capturing. Click Add New Template and you will then be able to type in the company name and search to see if any templates exist for that company that you can use.
Once you have captured your information you can re-save the template with your own changes.
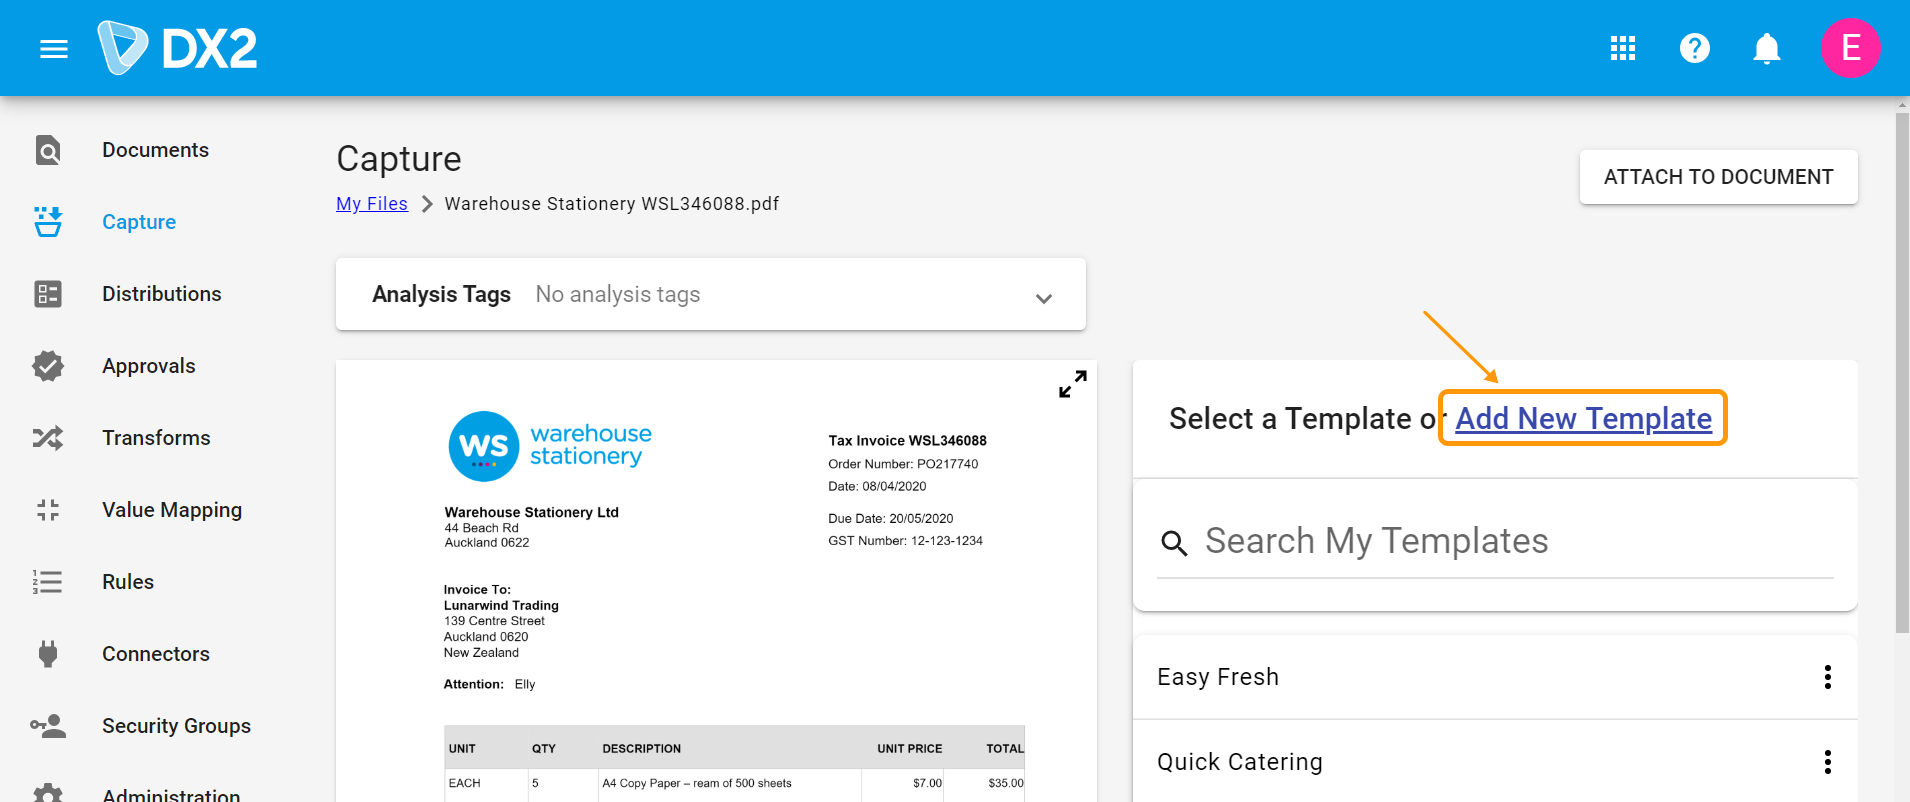
Olympic will be building up a library of templates over time.
# New – Ability to Approve a Document from Email
Important
Olympic will be deploying this feature on Friday the 24th April 2020. Please advise us ASAP if you do not wish to use this feature and we can turn it off for you, otherwise please advise all staff doing Approvals that this feature is available from Friday the 24th April 2020.
A feature is available to allow your staff action various requirements directly from within the email sent to them (i.e. they do not need to go back to the DX2 portal unless changes are required):
- Approve - approve the invoice as is:
Recode - send back for recode (a reason is required):
Reject - reject a document:
- Click the Invoice file name - this will take the user back to the DX2 portal.
# New – Activity Panel Enhancement
The Activity Panel will now show additional information as listed below:
- Document capture and creation.
- Document sent for approval.
- Confirmation of coding for a document.
- Approval of document at each level as the document moves through approval chain(s).
- Document notification(s) sent.
All the entries that were previously shown under the History Panel will now be part of the Activity panel. This will make it easy to follow the journey of the document.
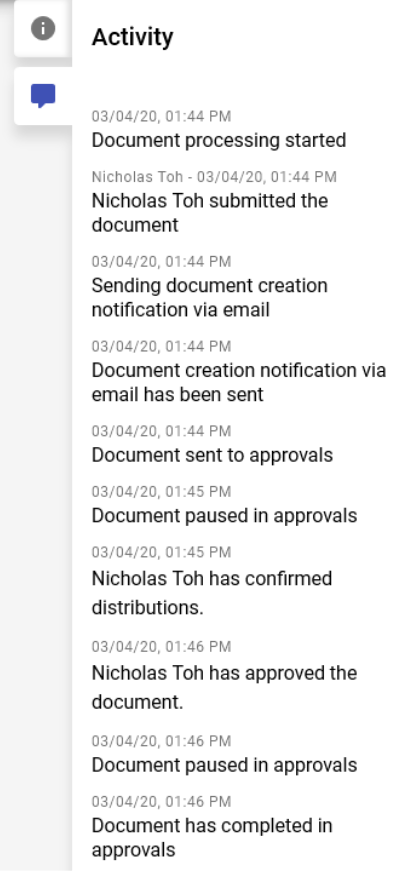
This additional information can be seen on the Activity panel from the Document view as well as from the Approval Document view.
# New – Deep Linking between DX2 Portal and Purchase
DX2 Portal, Purchase and DX2 Apps will now show an apps icon in the top right of the screen, to make navigation between the applications easier. Clicking on the apps icon will pop up from buttons that you can use to navigate to another application in the DX2 family using the same login.
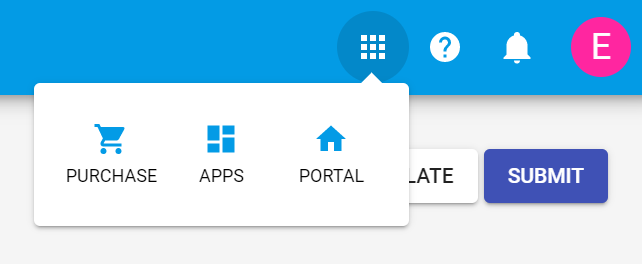
- Purchase will open another tab for DX2 Purchase using the same login details as the application you are navigating from.
- Apps will open another tab for DX2 APPS using the same login details as the application you are navigating from.
- Portal will open another tab for DX2 Portal using the same login details as the application you are navigating from.
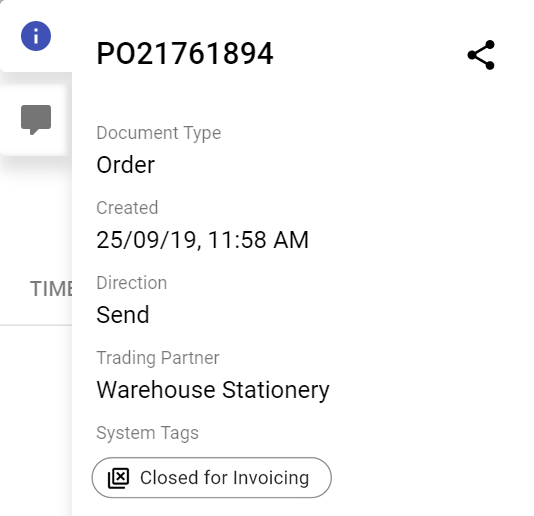
# New – Closing Purchase Order for Invoicing
Purchase orders need to be closed for invoicing when they are fully invoiced as well as when they are not fully invoiced but no further invoices are expected.
To achieve the above objective, we have introduced the functionality of adding a system tag labelled Closed for Invoicing to a Purchase Order automatically in certain scenarios. Where the Purchase Order is not tagged like this automatically, it can be closed manually in DX2 Portal by users with Coder permissions.

Scenario A – An invoice is auto-matched to a Purchase Order as per the Auto-Approval rules setup for your organisation.
The Closed for Invoicing system tag will be added to the Purchase Order automatically.

Scenario B – An Invoice is not auto-matched to an existing Purchase Order in the DX2 portal but the Purchase Order to refers to is Closed for Receipting. It does not matter if the Purchase Order is Fully Receipted, Partially Receipted or there are no receipts against it.
The Closed for Invoicing system tag will be added to the Purchase Order automatically if the conditions listed below are met.
- The Purchase Order exists in the DX2 Portal and is for the same Trading Partner as the Invoice
- The Purchase Order doesn't have any other invoices in an incomplete state (i.e. pending approval)
- The related Purchase Order has a Closed for Receipting system tag.
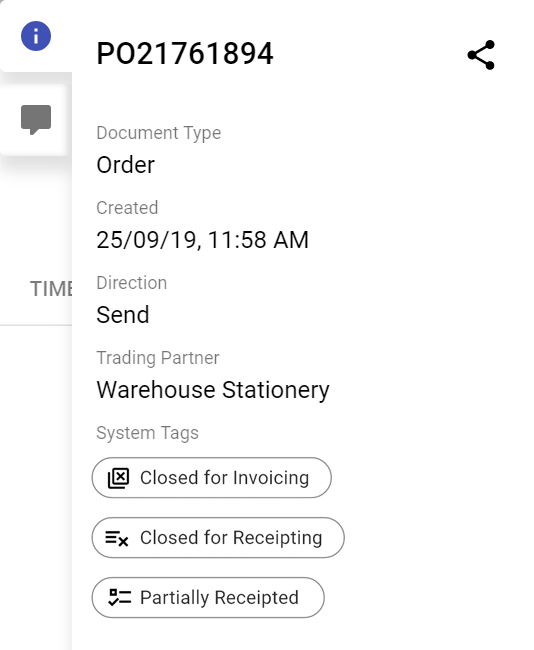
Scenario C – Manually close a Purchase Order for Invoicing. This will apply mainly when a Purchase Order is approved but has not been closed for receipting.
An approved Purchase Order can be closed for invoicing by users if the conditions listed below are met.
- The Purchase Order is Approved.
- The Purchase Order does not have the system tag of Closed for Invoicing.
- The Purchase Order doesn't have any invoices in an incomplete state (i.e. pending approval)
- The User's Security Group has Coder role permission.
In this scenario a Close Order button will appear on the Purchase Order Approval document. The Purchase Order can be closed by clicking on the button.

The Closed for Invoicing system tag will be added to the Purchase Order on closing it.
In all the above scenarios, when a Closed For Invoicing Purchase Order is referred to in an invoice which is captured or manually entered, the invoice will not be auto-matched.
If the Invoice is within tolerance but the PO is closed for Invoicing, the invoice will be Pending Approval with distributions applied as per the auto-approval process. The Invoice will go through the usual approval process.
If the Invoice is outside tolerance and the PO is closed for invoicing, the Invoice will be Pending Coding and will go through the usual approval process after coding is confirmed.
# February - Tolerances for Automatch
This release introduces the new tolerance feature that can be used in association with the automatch allowing purchase orders and invoices to be automatched when there are discrepancies that exist within the tolerance options set up
Please log any issues with support@olympic.co.nz.
# Add Tolerances For Purchase Order – Invoice Automatch
In the Administration area of DX2 you can now set up tolerances that will determine when an automatch between an invoice and associated purchase order does not have to be an exact match. A tolerance amount and/or percentage can be set.
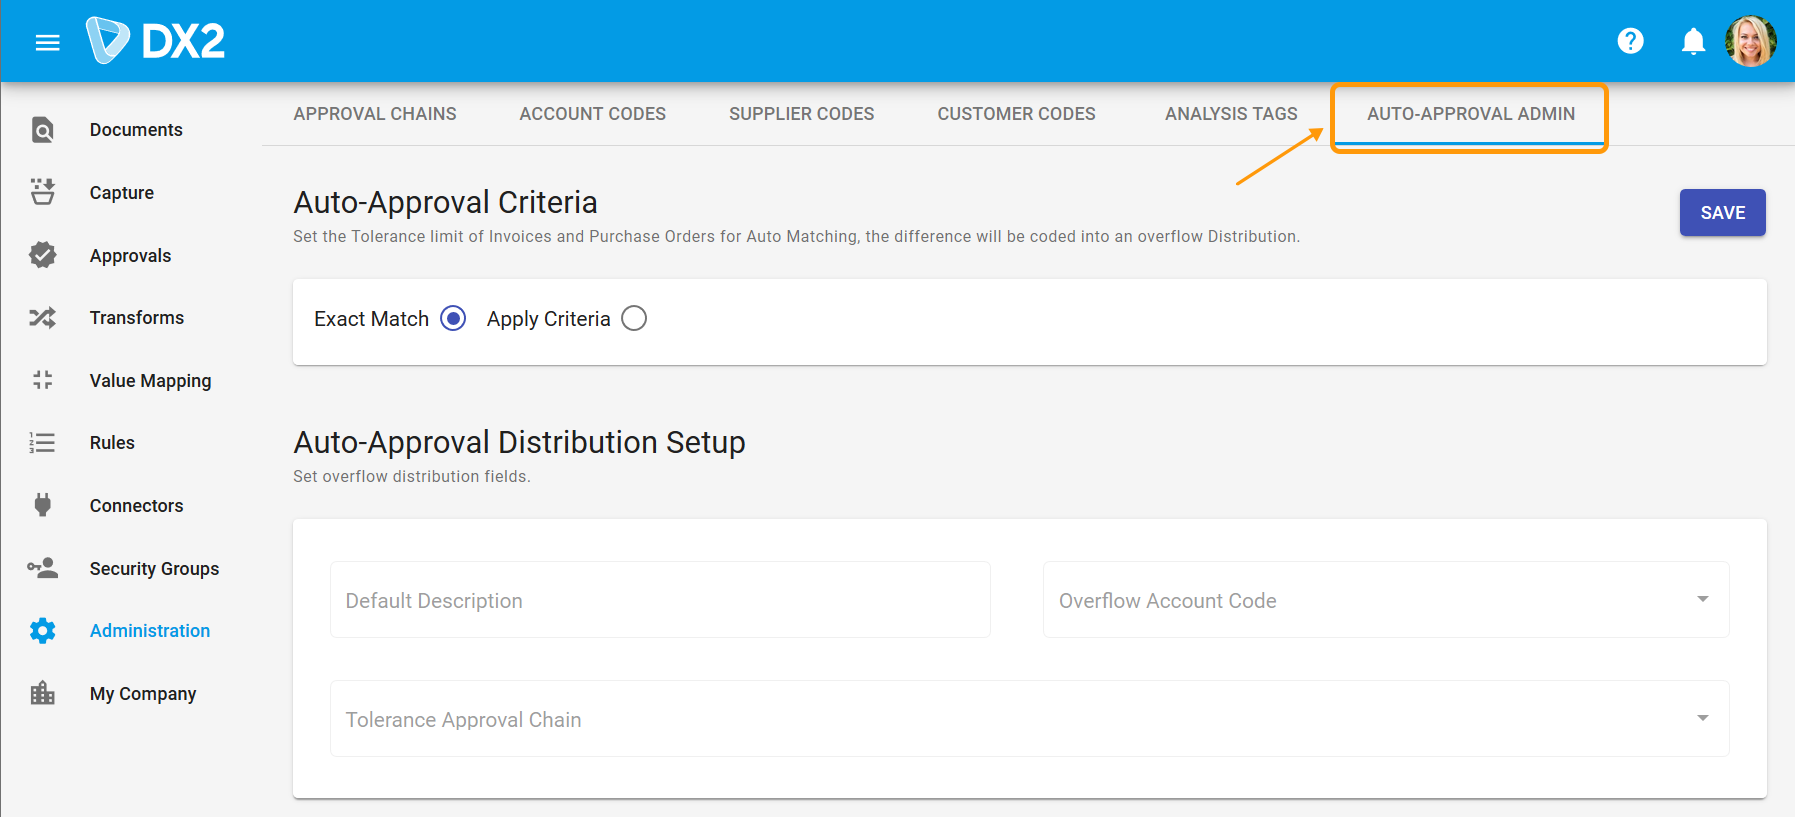
Read the full documentation and see examples here.
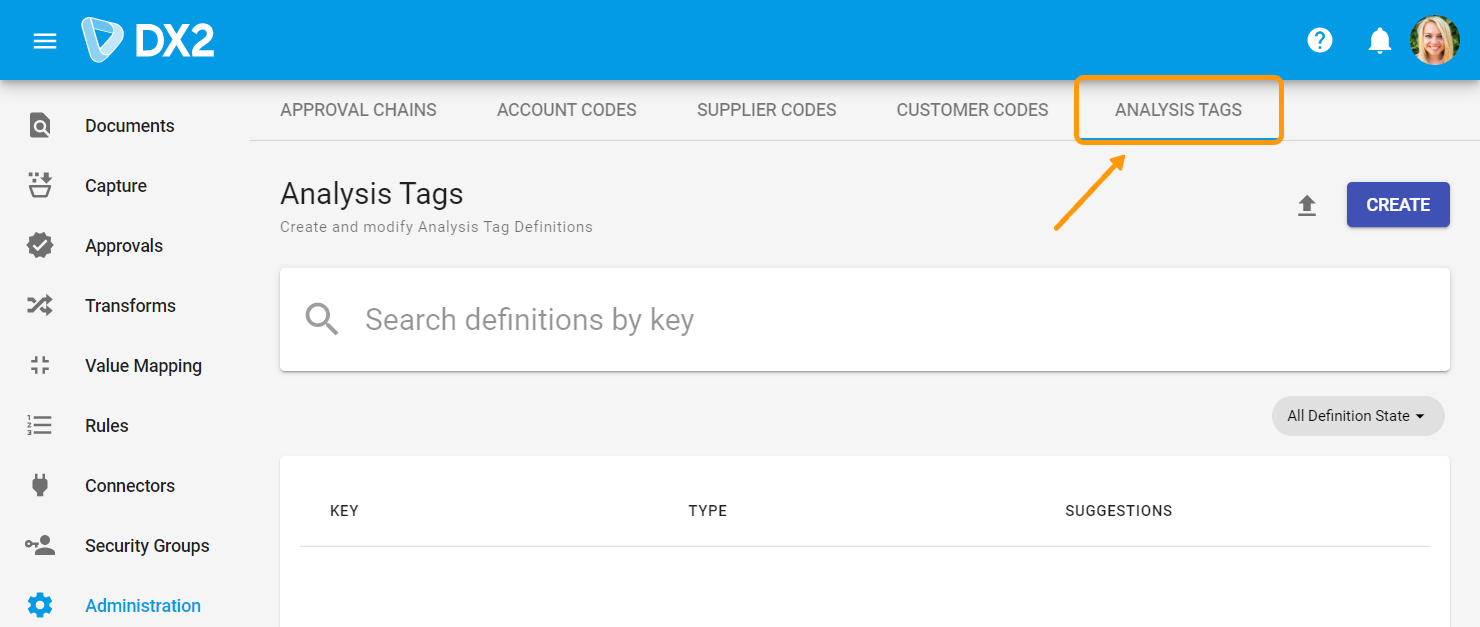
# February - Analysis Tags
# Required and Predefined Analysis Codes
As an expansion of functionality around the analysis tags to allow more consistency for reporting and take the guesswork out of tags, you can now set up predefined values in Analysis Tags. You can also specify where the Analysis Tags are required on distribution lines for a specific account code(s). The Analysis Tags can also be used in Approval Chain conditions.
Note: If required, we can map the required tags to existing fields in the GL distribution line within your ERP application.
In the Administration page, go to the Analysis Tags tab.
Predefined Analysis Tags
Click the Create button.

A window will open to create a New Analysis Tag:
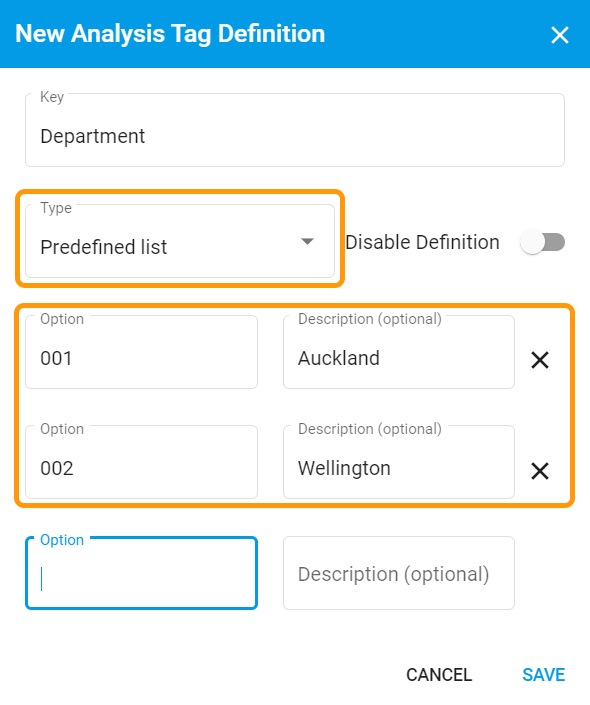
Under the Type, you are now able to drop down a list of options and select Predefined list as an option. If you select this option you must enter at least one option for selection from a dropdown when a user chooses a predefined tag.
Another new feature is the ability to associate a description with the option (optional). This means if you use numeric codes you can enter a description so that when a selection is made for an Analysis Tag the user can easily see what the numeric code pertains to.
Note: The new description field is now available on all Analysis Tags. Existing tags can be edited and the description added where required.
For predefined Analysis Tags, the user cannot create a dynamic value for that analysis tag during use. This means you get consistency when required for reporting. E.g. By department.
Analysis Tags can be used at document or distribution line level.
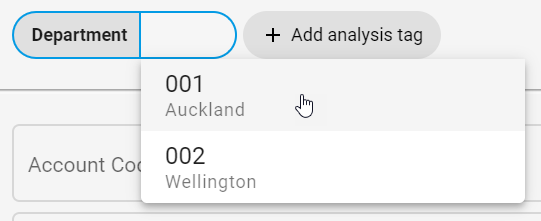
In the example above if a user selects Department as an Analysis Key in Approvals they can only select 001 or 002 from the list as per below.
Note: The existing analysis tags functionality where you can create tags at both document header and distribution line level “on the fly” (I.e. Autocomplete) remains the same.
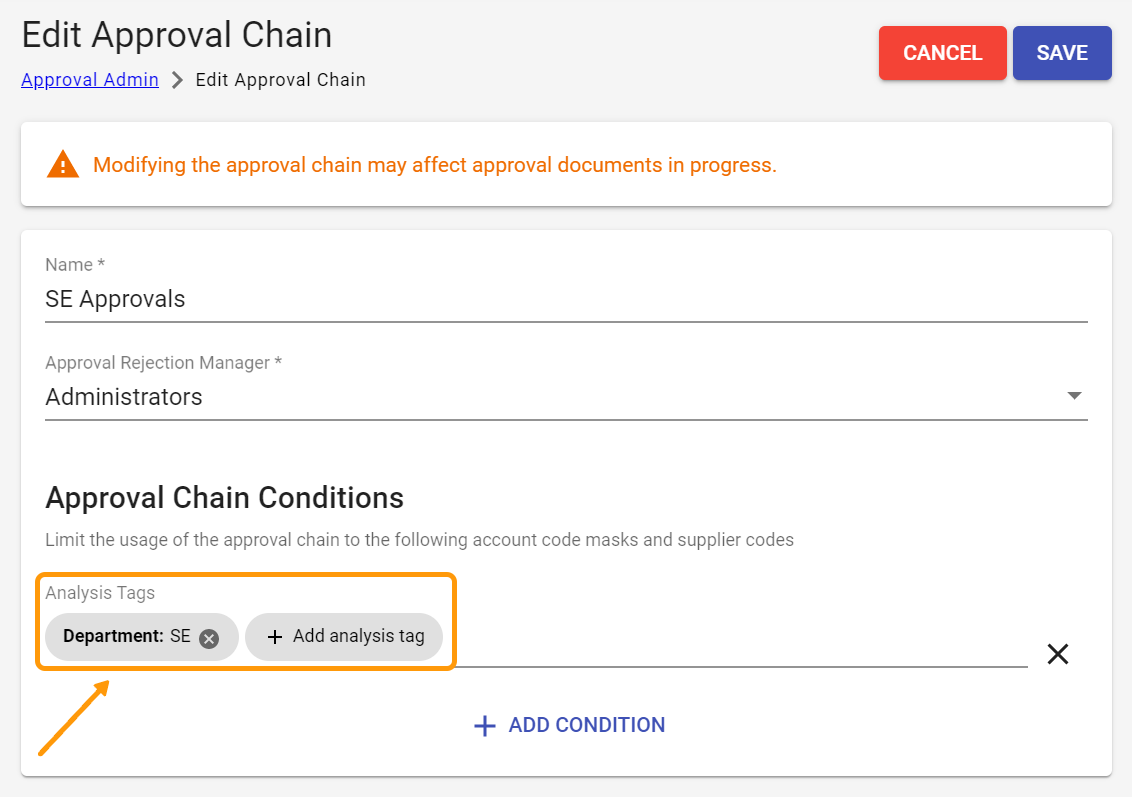
Assign Analysis Tags to Approval Chain Conditions
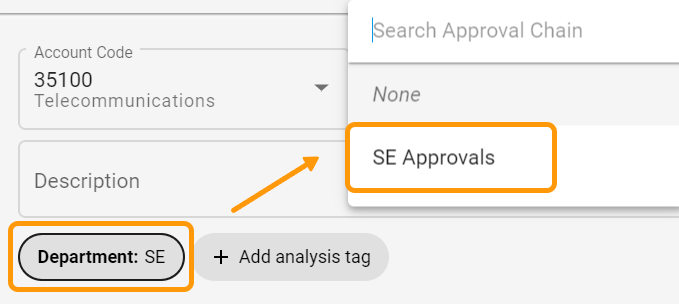
On the Approval Chains you can now use required analysis tags as part of, or as your selection criteria. This criteria is used in the distributions area to filter the Approval Chain list for selection.
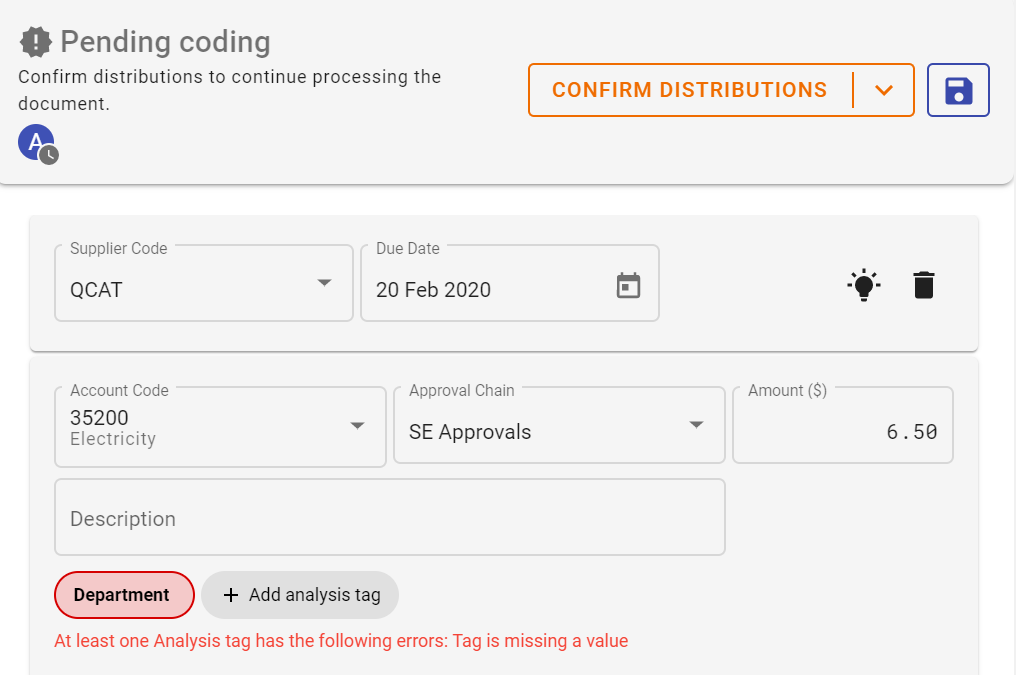
Assign Analysis Tag Values to Account Codes – Flag as Required
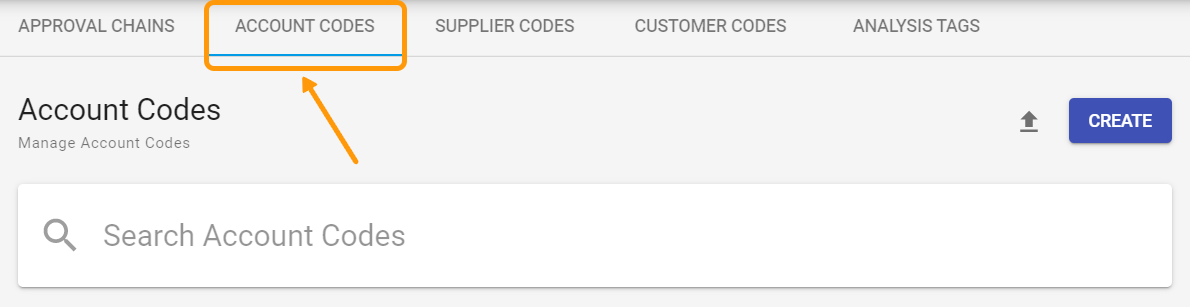
Further to the above analysis tags can be mapped to account codes and marked as Required if needed. To associate analysis tags with account codes go to the Administration area under the Account codes tag and either create a new code or edit an existing code.
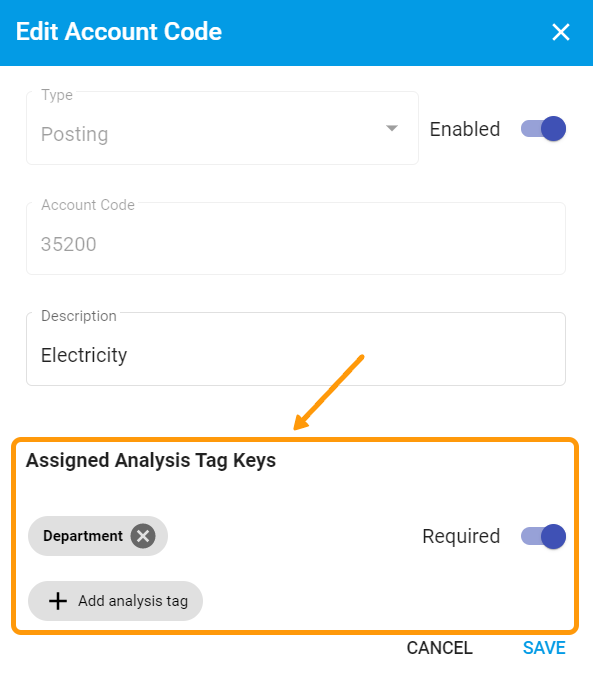
When an Account Code is used on a distribution line in Approvals and has a Required Analysis Tag(s) the user cannot go past the final approval without a value being selected.
If the toggle is kept in the OFF position (suggested), but the analysis tag is still added on the account code then the tag will still be shown on the distribution line as a “suggested” analysis tag when that code is used.

# Bulk Upload Account Codes – Include Analysis Tags
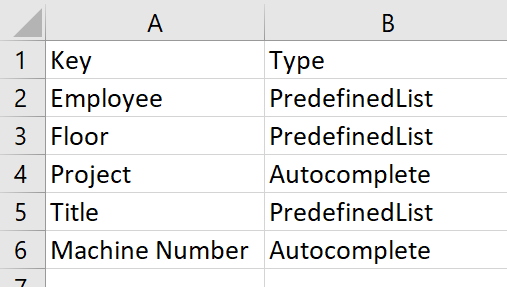
If you have associated analysis codes for many accounts, you can use a .csv file to bulk upload the associated Analysis Tags for the GL accounts.
Note: The analysis codes must exist in DX2 first before being used in this upload.
.CSV Example – GL Account Codes with associated Analysis Tags

The bulk upload is available via the Administration menu in the Account Codes tab.

# Bulk Upload Analysis Tags
The Analysis Tags themselves and associated values can also be uploaded in bulk.
.CSV Example – Analysis Tags and associated Type
.CSV Example – Suggestions (Values) and Descriptions For Analysis Tags
Note: The Analysis Tag must already exist in DX2 or be in the current upload as the below.
The bulk upload is available via the Administration menu in the Analysis Tags tab.

# February - Notifications
This release has major changes to the transactional notifications (on portal and emails) in DX2. Many customers have complained about the number of emails received from DX2. These changes will minimize the amount of emails received each day.
You will still receive emails such as password reset and Trading Partner invites.
Please log any issues with support@olympic.co.nz.
Important
You will no longer get individual emails per Document for approvals for example. Please advise your wider group that these changes will be taking effect.
# Consolidation of Notifications
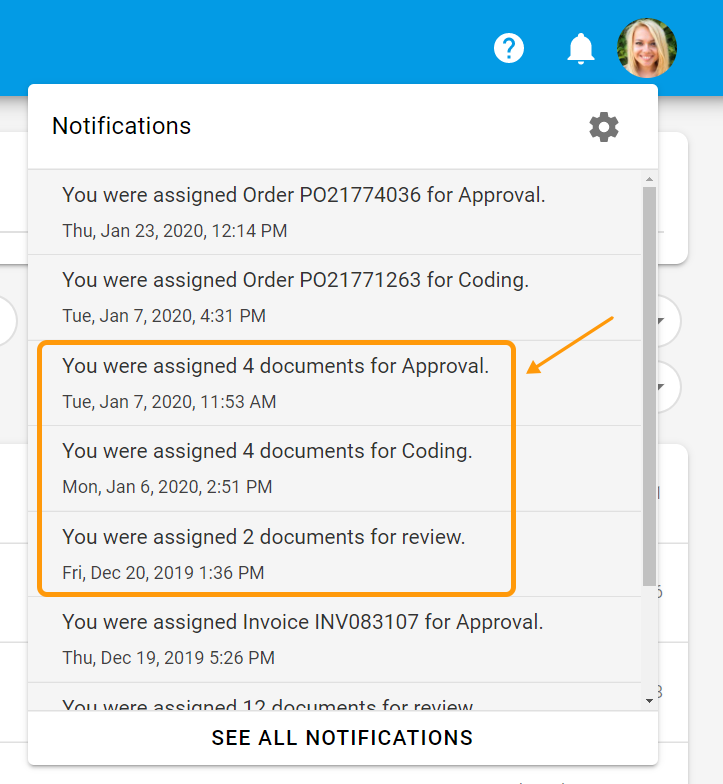
In DX2 you will no longer get individual notifications listed per Document. Any 'same' actions around documents will be consolidated. To see the details click into the notification message and you will be taken to the most relevant page. E.g. For Approvals messages you will be directed to the Approvals area.
New notifications appear in DX2 with a red number over the bell icon:
![]()
Example of new consolidated notifications:
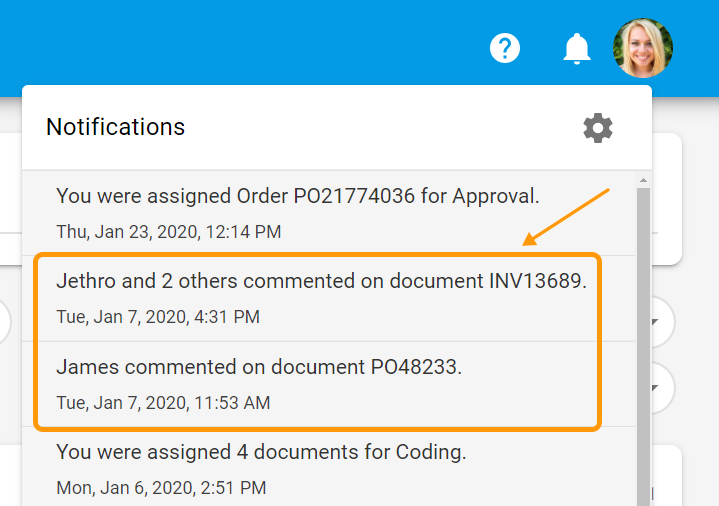
TIP
Where you are exchanging comments with your supplier, any supplier replies or comments from your own organization will show as a notification so you know you have had responses. Many comments for a single document will be consolidated.

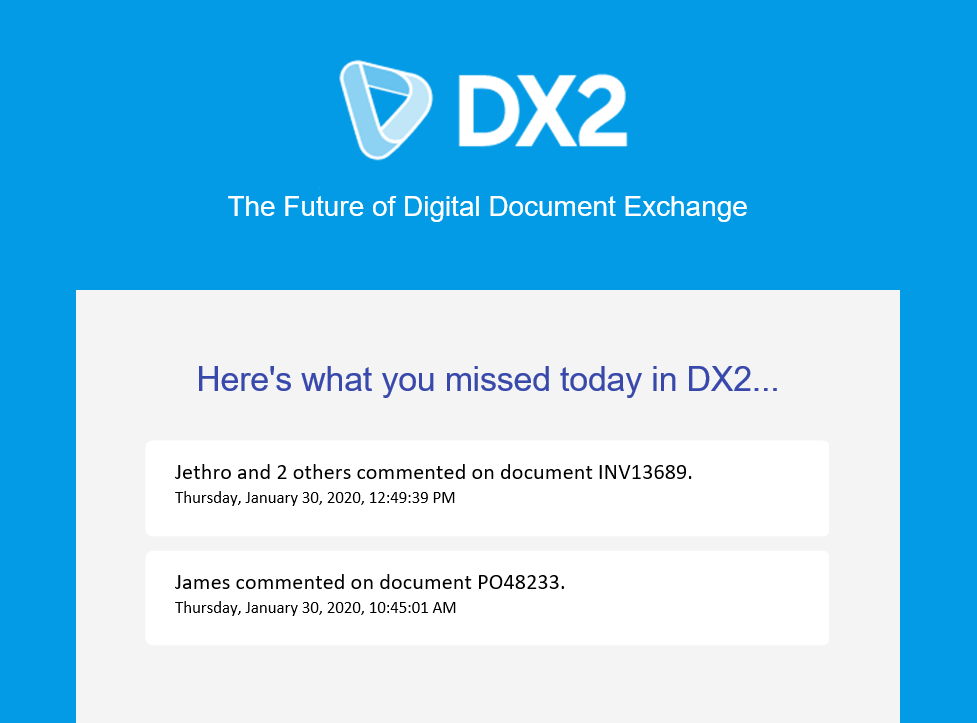
# Email Notifications
You will no longer receive document specific emails. Any notifications will come via the portal as per above. If the notifications are reviewed, (by clicking on the notifications icon as per above), then you will not receive any email. If notifications are not reviewed, then a consolidated email will be sent once a day in the afternoon at around 3pm.
The email will contain consolidated messages for all outstanding notifications and you can click into DX2 from the email if required.
Note: If you feel this daily email should be sent more often please give us your feedback once you have tried it out.
Further user customisations which will allow you to set your own frequency and type of notifications are in the pipeline and will be in upcoming releases.
# January
This release includes a new DX2 Module called DX2 Apps which integrates with DX2 functionality. Our first DX2 App for release is Credit Notes.
Please log any issues with support@olympic.co.nz.
Important
If you would like to set up the Credit Note functionality in your DX2 Portal please contact your Account Manager as some set up is required.
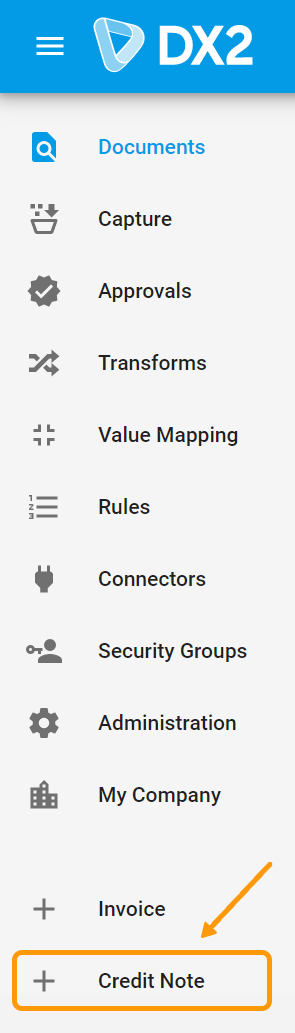
# Credit Note Entry
To access Credit Notes via the DX2 App, you can navigate via the DX2 Portal menu and you will automatically be logged in.
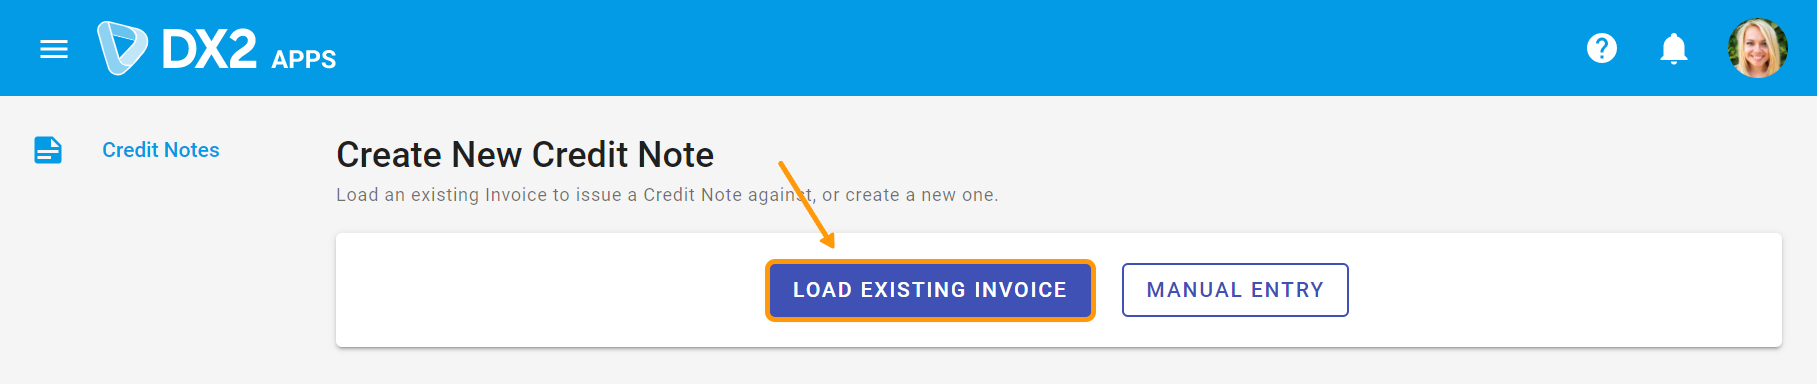
# Load Existing Invoice
You can create a Credit Note based on an existing invoice as long as the invoice is not in the middle of processing via an approval chain.
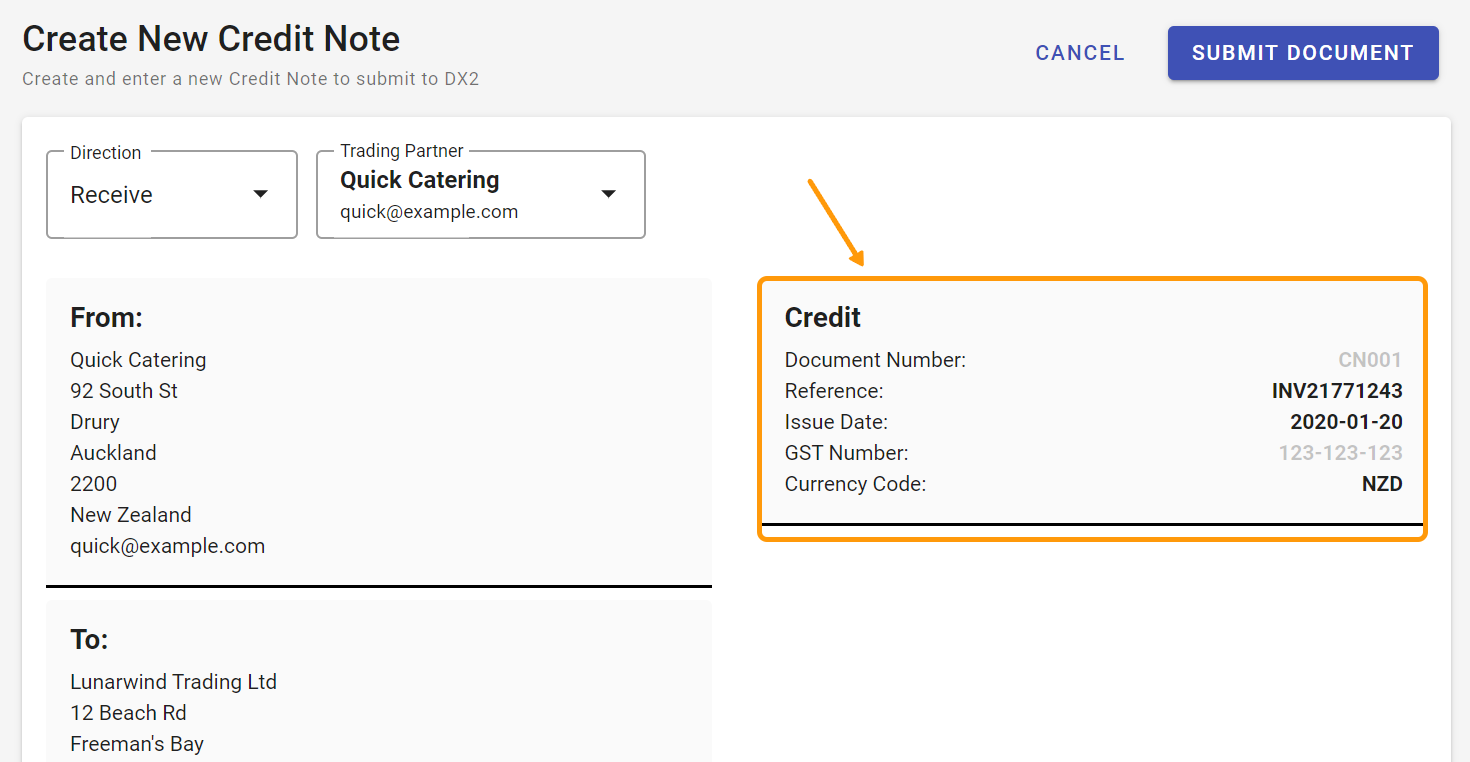
You can filter on Document Number or Trading Partner, then click the invoice to select it. All the information from the invoice will be loaded into the Credit Note.
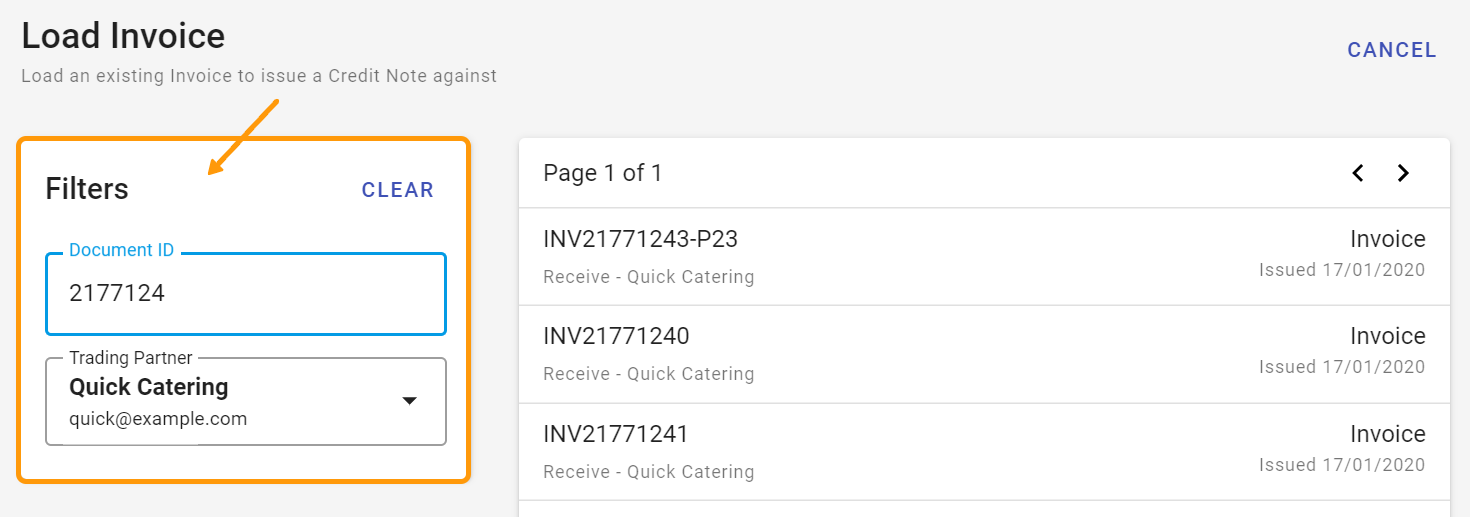
You can then enter your Credit Note document number and edit the line information as required by clicking in the required area and editing the information.
Clicking into a field opens an edit window:
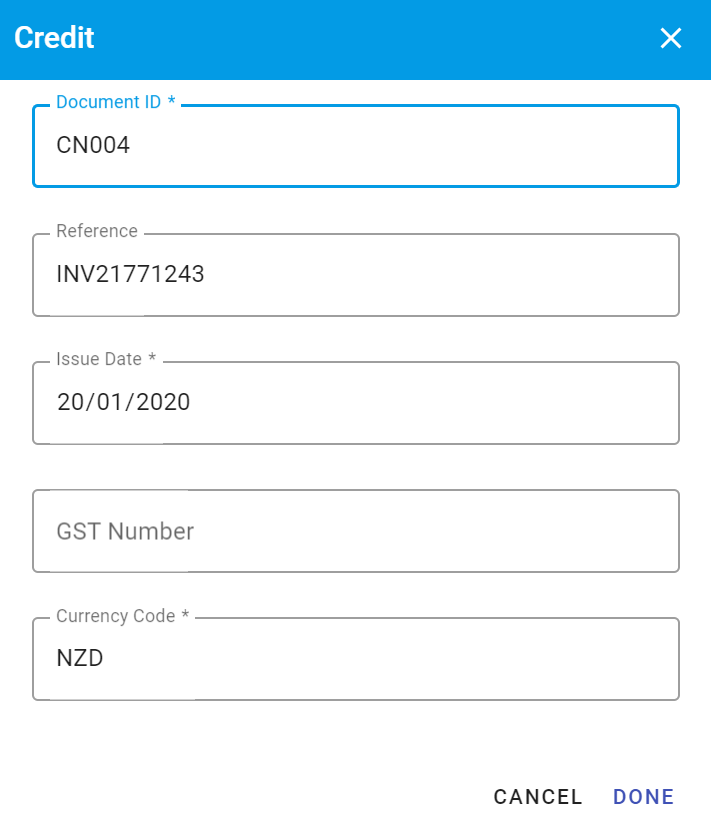
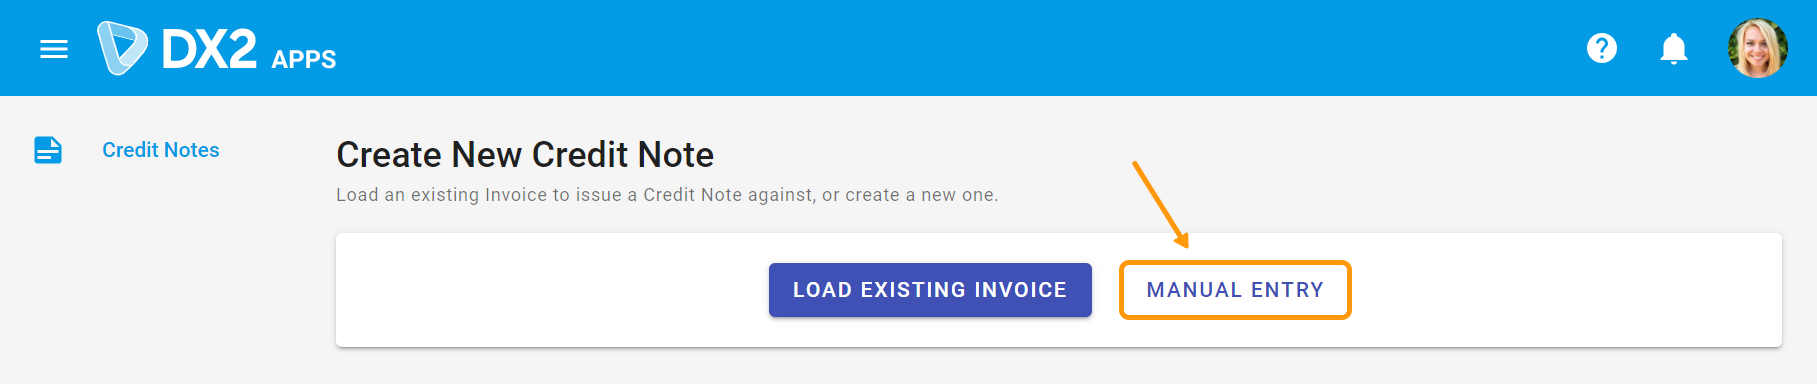
# Manual Entry
You can also manually type in the information for a Credit Note.
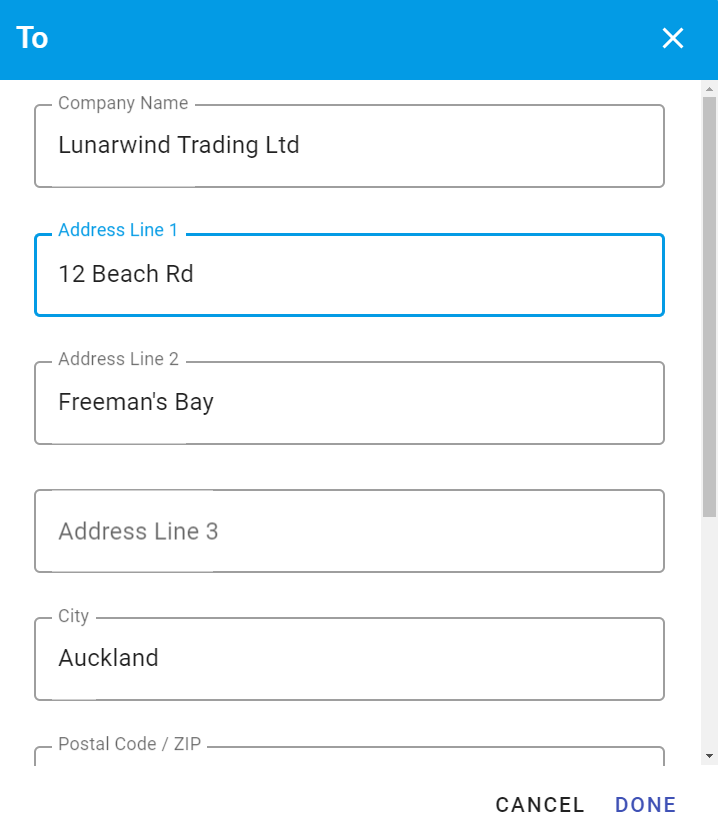
The To field information is filled in for you based on your own Trading Partner information in DX2 but can be edited if required.
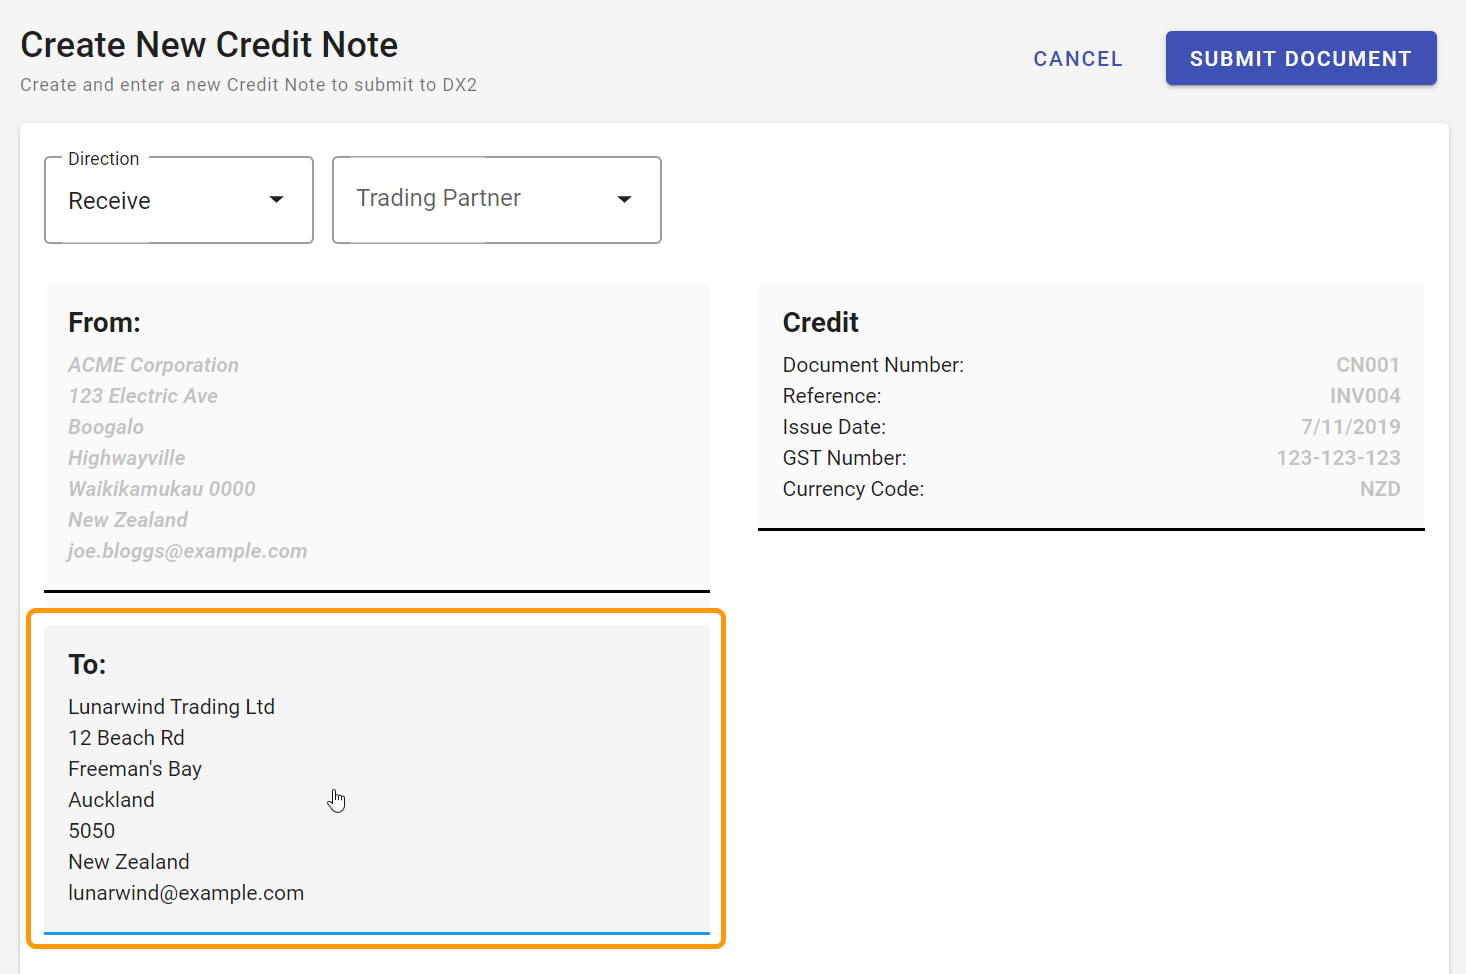
Clicking on the To field opens the edit window:
Your line sub totals must match the document subtotal.
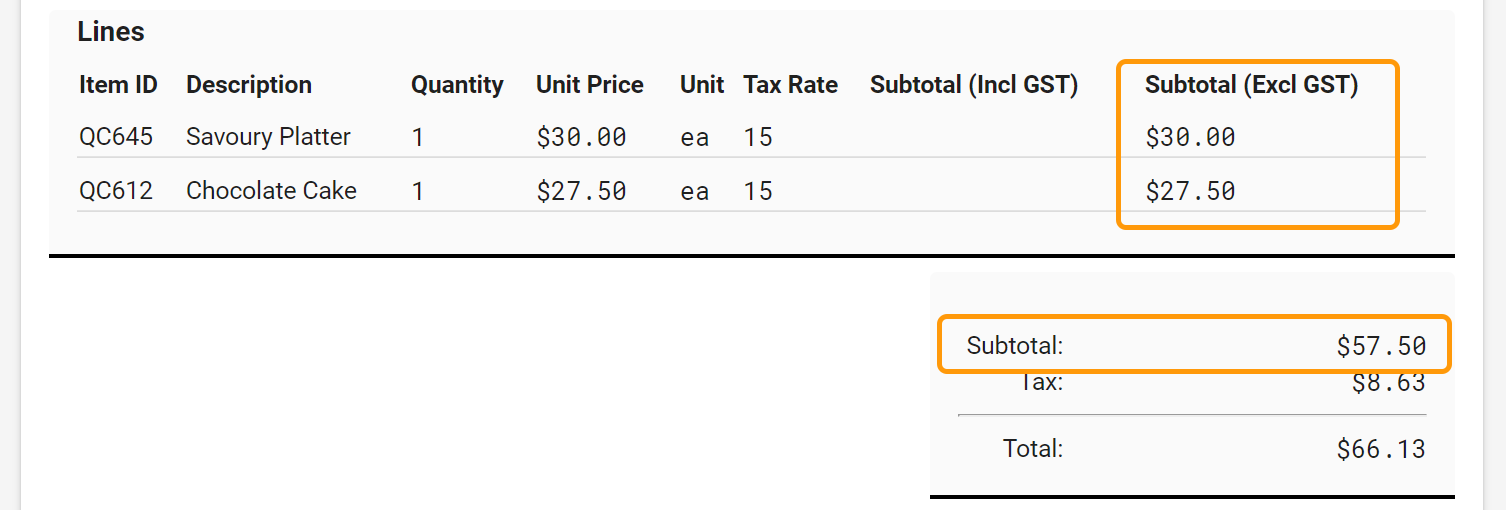
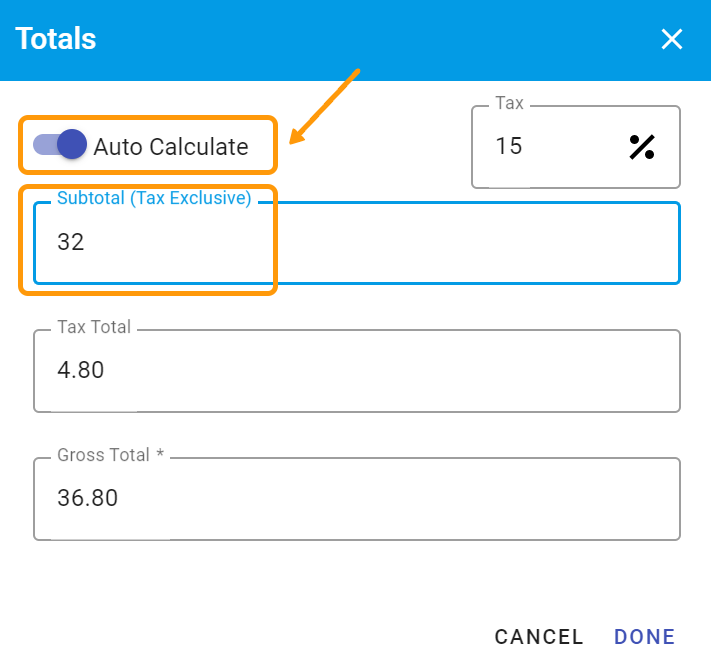
In the Totals field, if you enter the subtotal and tax percentage you can apply the Auto Calculate to fill in the additional total information.
When you click Submit Document, your Credit Note will be sent to the DX2 Portal.

From there you need to have rules and transforms in place (just like with Invoices) to code and approve the Credit Note and send to your ERP application. Olympic will be in touch to set this up.